> ## Documentation Index
> Fetch the complete documentation index at: https://docs.bytebase.com/llms.txt
> Use this file to discover all available pages before exploring further.
# Create Issue with Bytebase API
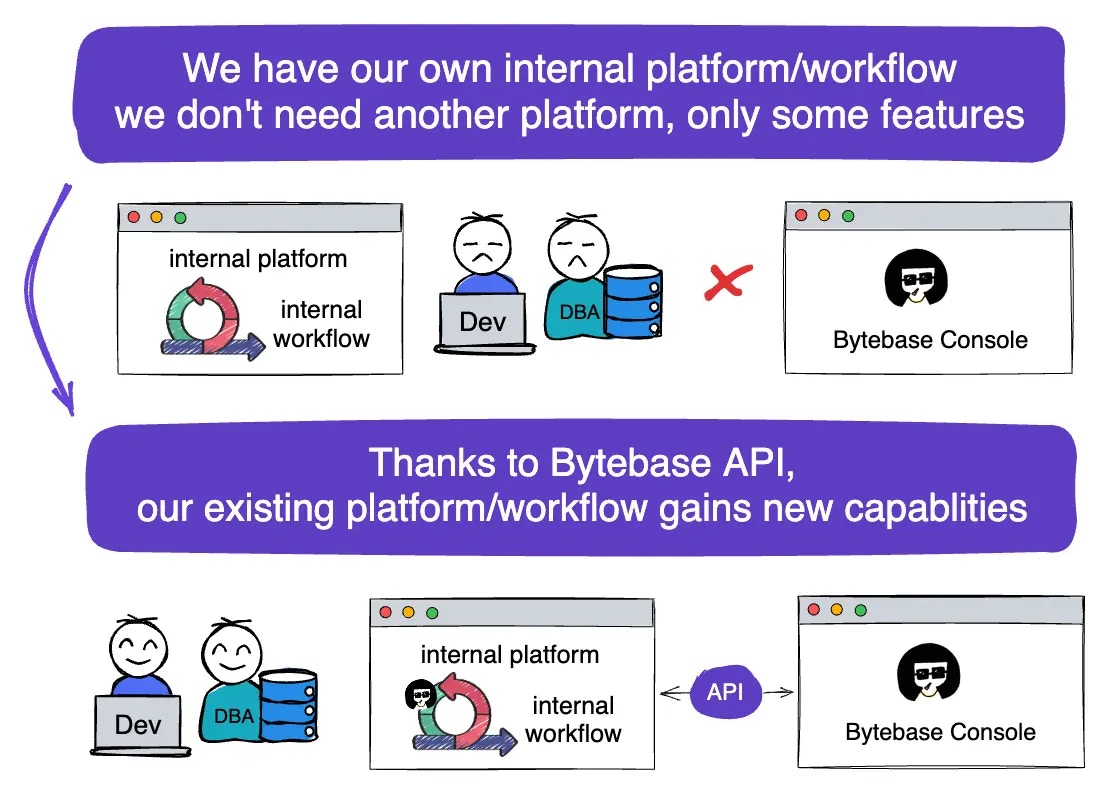
Bytebase is a database DevSecOps platform designed for developers, security, DBA, and platform engineering teams. While it offers an intuitive GUI for managing database schema changes and access control, some teams may want to integrate Bytebase into their existing DevOps platforms using the [Bytebase API](/integrations/api/overview/).
 In this tutorial, you will begin by creating a schema change within the Bytebase console. Then, you will proceed to run an external sample application that utilizes the API to create a similar change.
By following the step-by-step instructions provided, you will have the opportunity to explore and experiment with the Bytebase API. This will give you a practical understanding of how to incorporate it into your own application.
## Repository
[https://github.com/bytebase/example-api/tree/main/issue-creation](https://github.com/bytebase/example-api/tree/main/issue-creation)
## Prerequisites
1. [Docker](https://www.docker.com/) installed
2. Node.js >= v18
## Start Bytebase
Make sure your Docker daemon is running. Copy and paste the commands to start Bytebase.
```bash theme={null}
docker run --rm --init \
--name bytebase \
--publish 8080:8080 --pull always \
--volume ~/.bytebase/data:/var/opt/bytebase \
bytebase/bytebase:latest
```
Bytebase is now running via Docker, and you can access it via `localhost:8080`. Register the first admin account which will be granted [`Workspace Admin`](/administration/roles).
## Create Service Account
1. Log in as `Workspace Admin`, and go to **IAM & Admin** > **Users & Groups**. Click **+ Add User**, fill in with `api-sample`, choose the `Workspace DBA` role sufficient for this tutorial and click **Confirm**.
In this tutorial, you will begin by creating a schema change within the Bytebase console. Then, you will proceed to run an external sample application that utilizes the API to create a similar change.
By following the step-by-step instructions provided, you will have the opportunity to explore and experiment with the Bytebase API. This will give you a practical understanding of how to incorporate it into your own application.
## Repository
[https://github.com/bytebase/example-api/tree/main/issue-creation](https://github.com/bytebase/example-api/tree/main/issue-creation)
## Prerequisites
1. [Docker](https://www.docker.com/) installed
2. Node.js >= v18
## Start Bytebase
Make sure your Docker daemon is running. Copy and paste the commands to start Bytebase.
```bash theme={null}
docker run --rm --init \
--name bytebase \
--publish 8080:8080 --pull always \
--volume ~/.bytebase/data:/var/opt/bytebase \
bytebase/bytebase:latest
```
Bytebase is now running via Docker, and you can access it via `localhost:8080`. Register the first admin account which will be granted [`Workspace Admin`](/administration/roles).
## Create Service Account
1. Log in as `Workspace Admin`, and go to **IAM & Admin** > **Users & Groups**. Click **+ Add User**, fill in with `api-sample`, choose the `Workspace DBA` role sufficient for this tutorial and click **Confirm**.
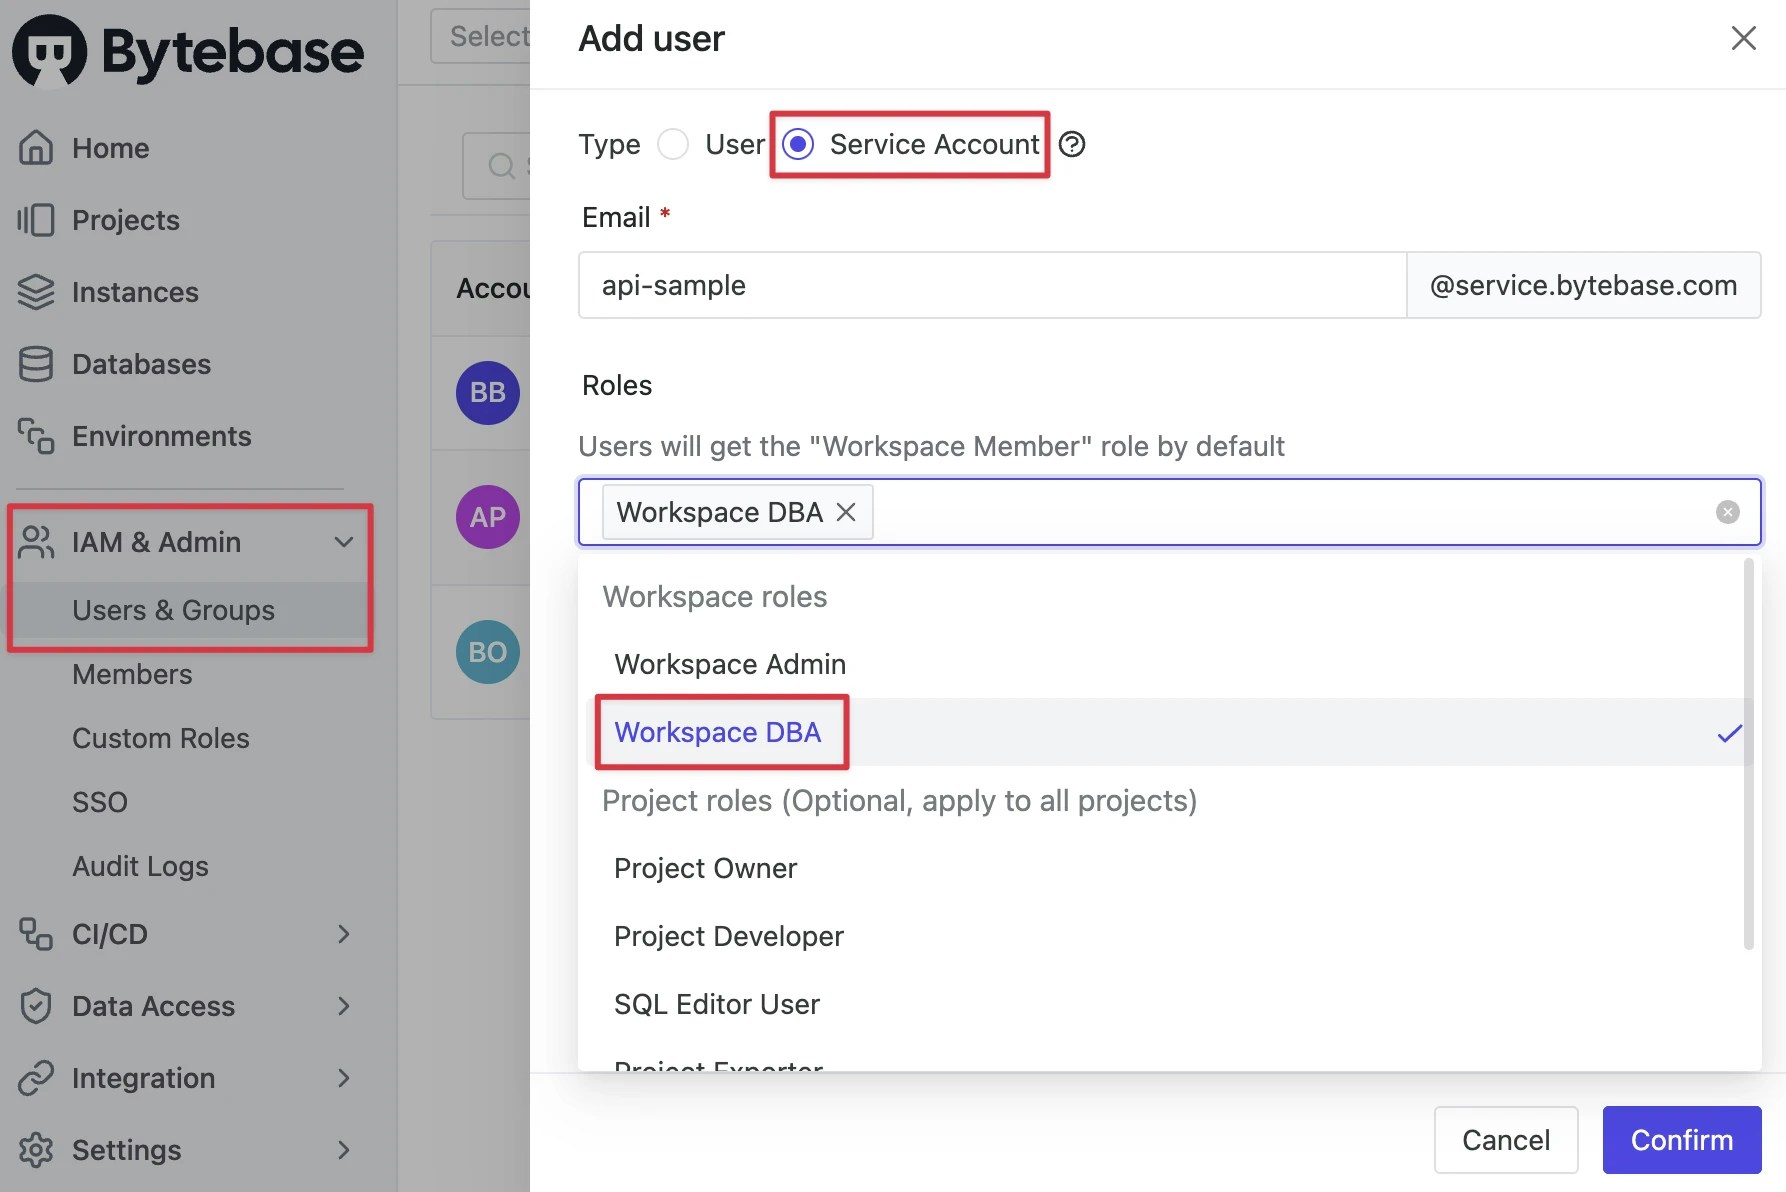 2. Find the newly created service account and **Copy Service Key**. We will use this token to authenticate the API calls.
 ## Create a schema change in Bytebase Console
Let's first review how to create a schema change from console directly.
1. Stay in Bytebase console, go to `Sample Project`. Click the checkbox for `hr_prod` and click **Edit Schema**.
2. Switch **Raw SQL**, paste the following SQL statement and click **Preview issue**.
```sql theme={null}
CREATE TABLE test_from_console (
id integer NOT NULL
);
```
3. Click **Create**, after the automatic checks are done, it'll automatically deploy the change. The issue will become **Done**.
## Create a schema change via Bytebase API
Below is an example app demonstrating the following APIs:
* List all projects
* List all database under a project
* Create a schema change issue in the project
* Get the created issue status.
***
1. Clone [Bytebase API Example
repo](https://github.com/bytebase/example-api) and navigate to the `issue-creation` folder.
2. Copy `env-template.local` to `.env.local`.Update the variables.
* `NEXT_PUBLIC_BB_URL`: `http://localhost:8080`
* `NEXT_PUBLIC_BB_SERVICE_ACCOUNT`: `api-example`
* `NEXT_PUBLIC_BB_SERVICE_KEY`: service key copied in Step 2
3. Run the following commands to start the sample application.
```bash theme={null}
pnpm i && pnpm dev
```
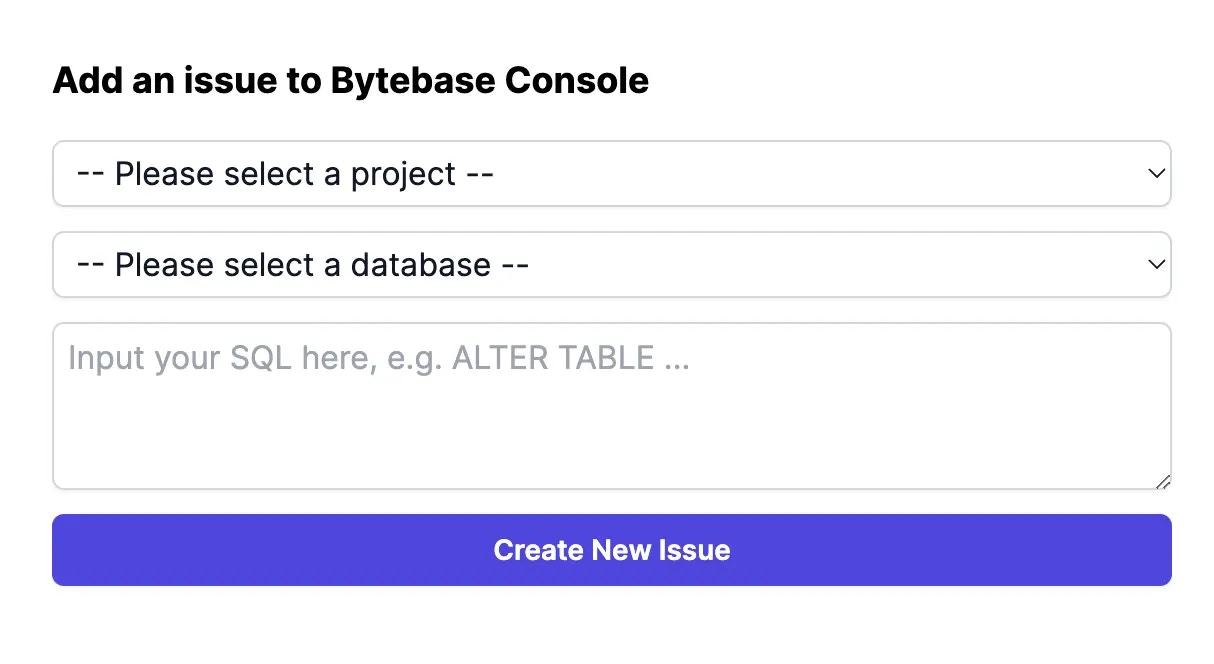
4. Open the application in your browser, you'll see the following page.
## Create a schema change in Bytebase Console
Let's first review how to create a schema change from console directly.
1. Stay in Bytebase console, go to `Sample Project`. Click the checkbox for `hr_prod` and click **Edit Schema**.
2. Switch **Raw SQL**, paste the following SQL statement and click **Preview issue**.
```sql theme={null}
CREATE TABLE test_from_console (
id integer NOT NULL
);
```
3. Click **Create**, after the automatic checks are done, it'll automatically deploy the change. The issue will become **Done**.
## Create a schema change via Bytebase API
Below is an example app demonstrating the following APIs:
* List all projects
* List all database under a project
* Create a schema change issue in the project
* Get the created issue status.
***
1. Clone [Bytebase API Example
repo](https://github.com/bytebase/example-api) and navigate to the `issue-creation` folder.
2. Copy `env-template.local` to `.env.local`.Update the variables.
* `NEXT_PUBLIC_BB_URL`: `http://localhost:8080`
* `NEXT_PUBLIC_BB_SERVICE_ACCOUNT`: `api-example`
* `NEXT_PUBLIC_BB_SERVICE_KEY`: service key copied in Step 2
3. Run the following commands to start the sample application.
```bash theme={null}
pnpm i && pnpm dev
```
4. Open the application in your browser, you'll see the following page.
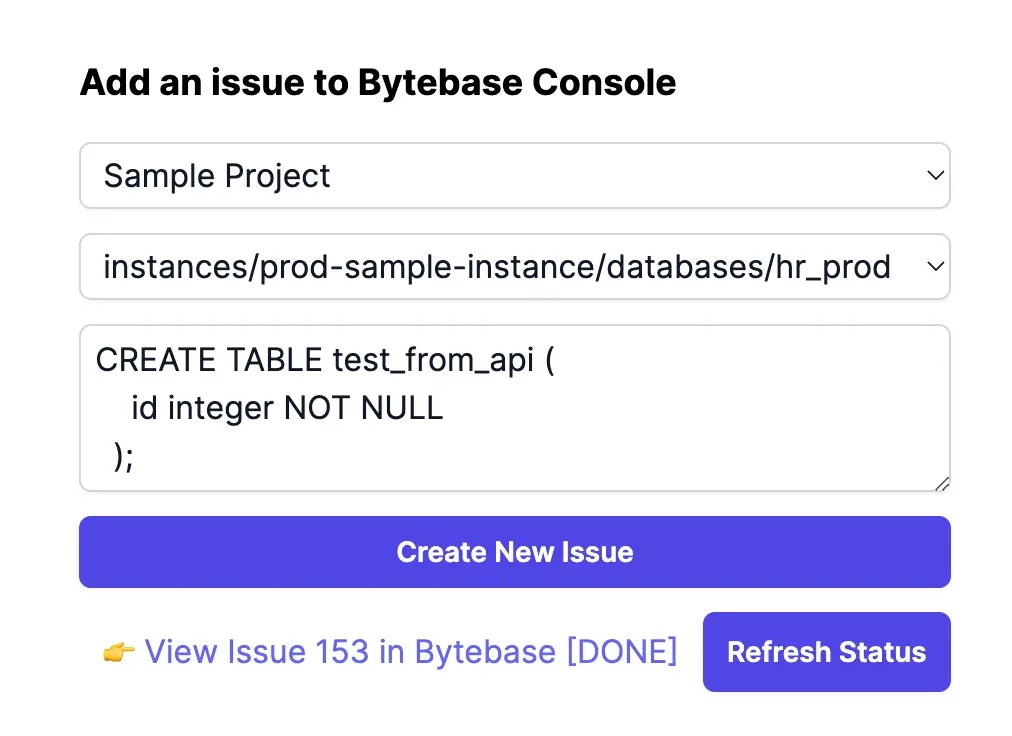
 5. Choose `Sample Project`, then `hr_prod`, input the following SQL and click **Create New Issue**.
```sql theme={null}
CREATE TABLE test_from_api (
id integer NOT NULL
);
```
6. The issue will be created and you'll see the following page.
5. Choose `Sample Project`, then `hr_prod`, input the following SQL and click **Create New Issue**.
```sql theme={null}
CREATE TABLE test_from_api (
id integer NOT NULL
);
```
6. The issue will be created and you'll see the following page.
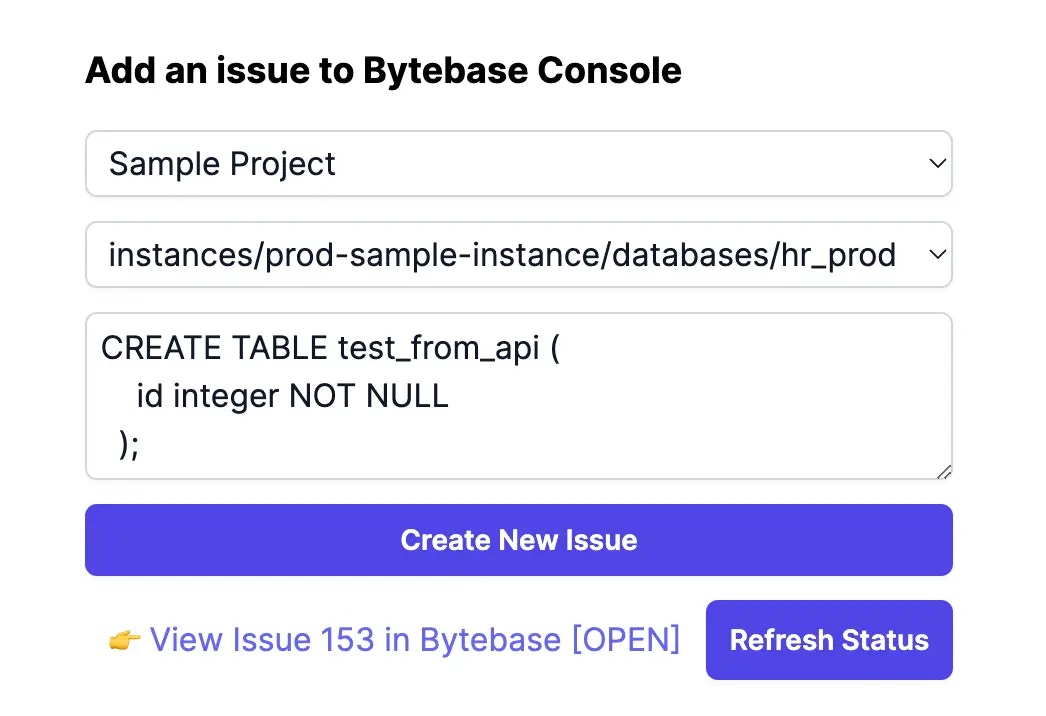 7. Click the link `View issue xxx in Bytebase[OPEN]` to see the issue in Bytebase Console. You'll notice the issue rolls out automatically and becomes `Done`.
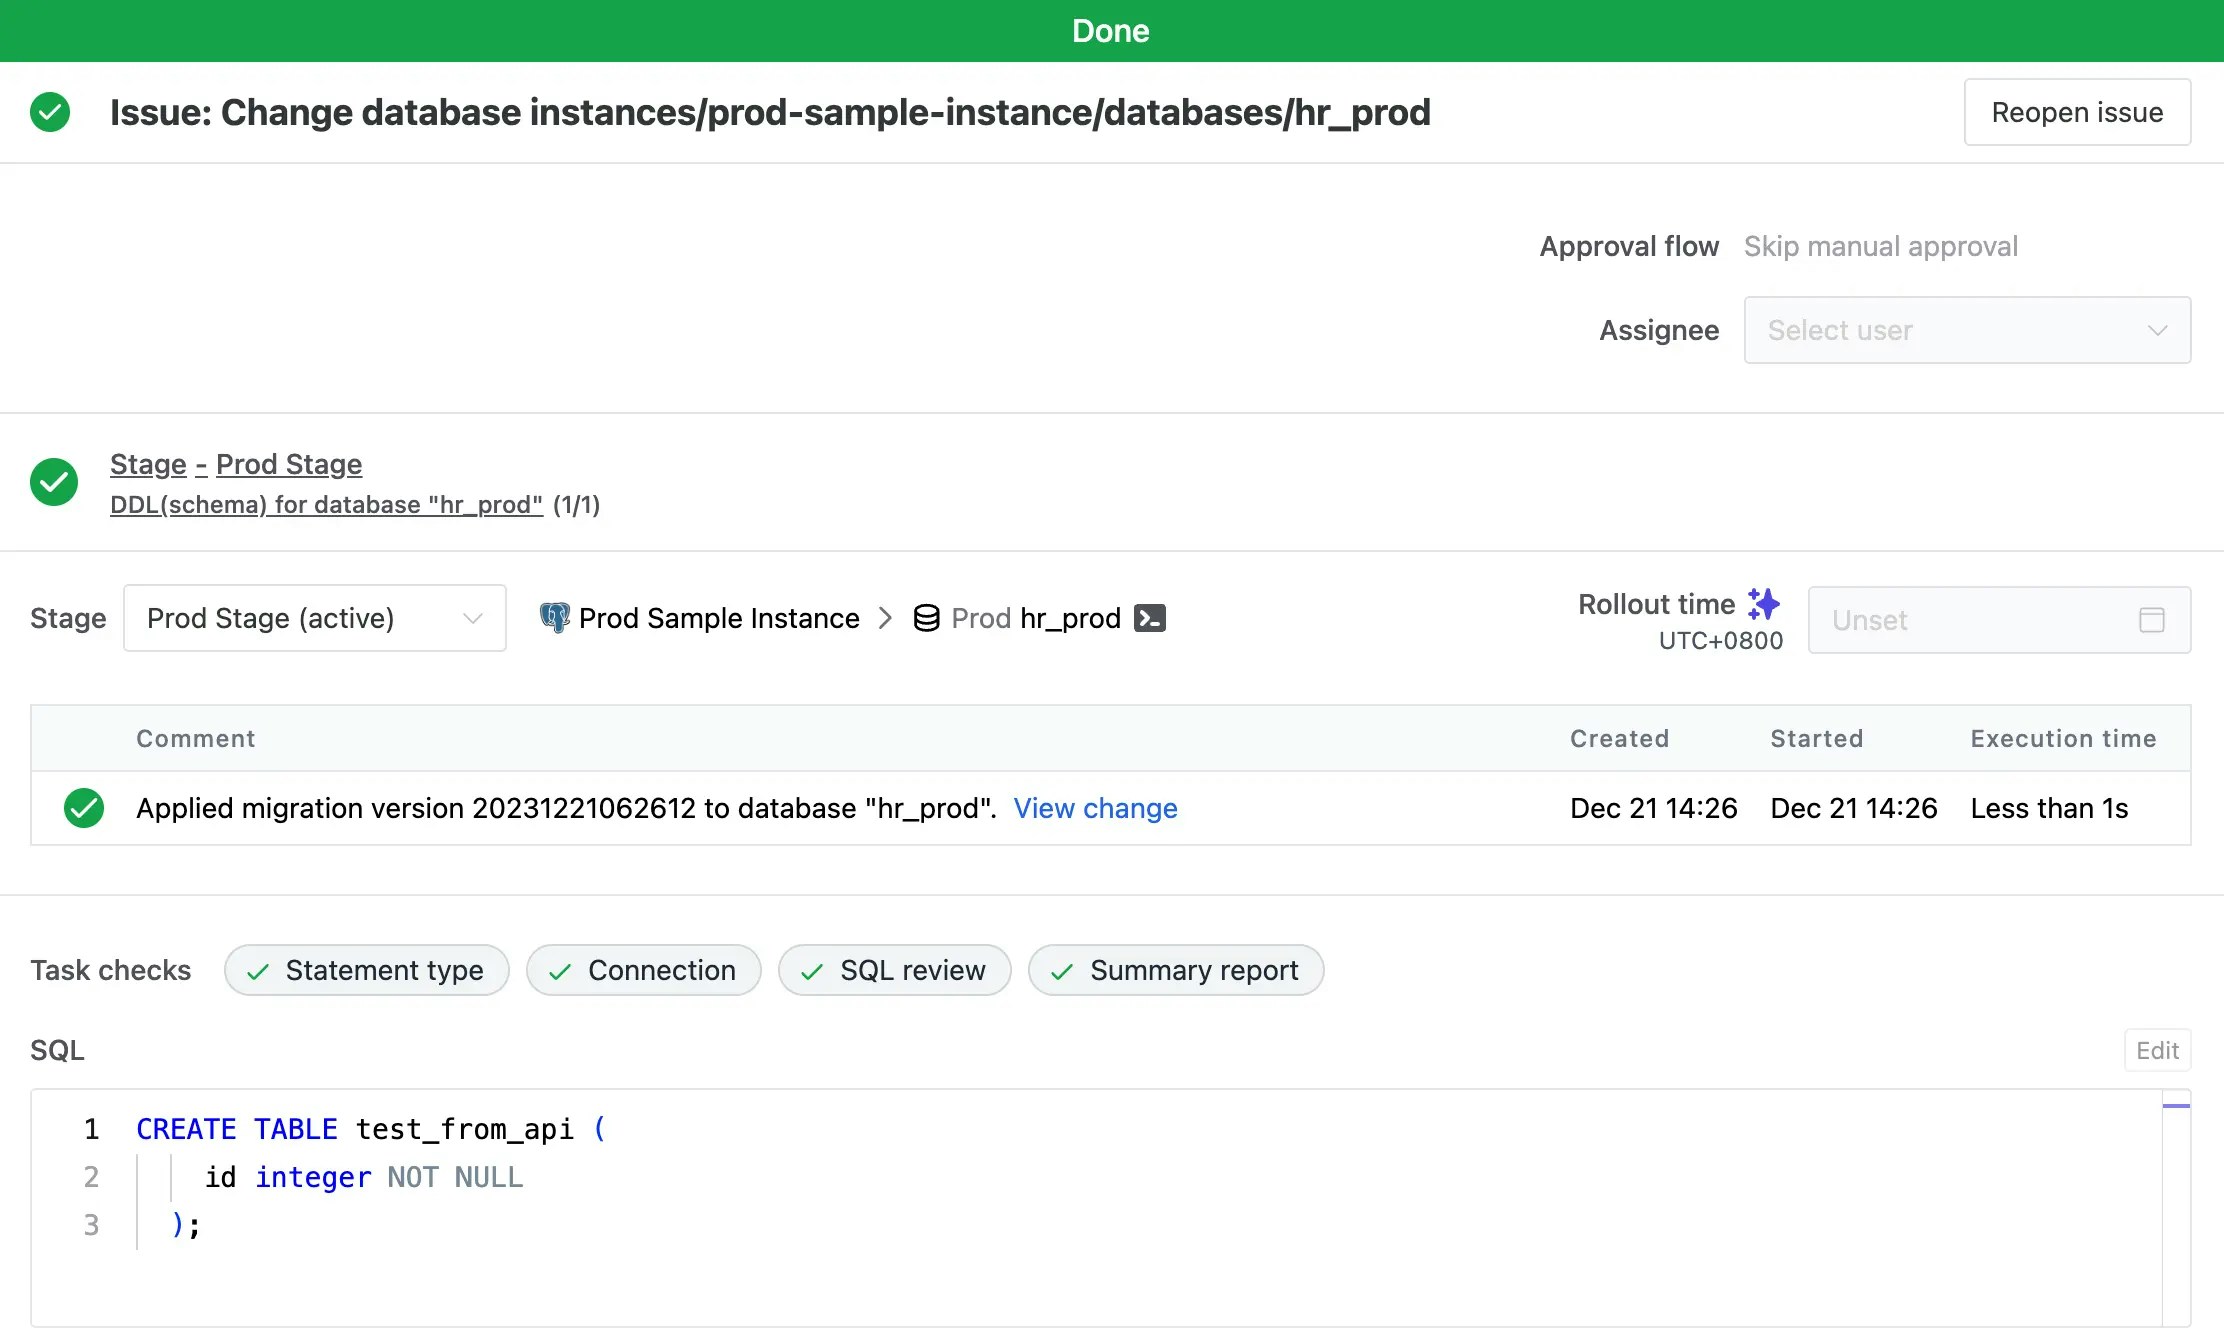 8. Go back to the sample application, and click **Refresh status**. You'll see the status has changed from \[OPEN] to \[DONE].
 9. For additional information about the example application, refer to the README in its corresponding [GitHub repository](https://github.com/bytebase/example-api/).
## Summary
Congratulations! You've successfully created a schema change via Bytebase API. In similar ways, you could integrate Bytebase API into your existing DevOps platform to automate your schema change process, and benefit from Bytebase features such as [SQL Review](/sql-review/review-policy/) and [Custom Approval](/change-database/approval/).
9. For additional information about the example application, refer to the README in its corresponding [GitHub repository](https://github.com/bytebase/example-api/).
## Summary
Congratulations! You've successfully created a schema change via Bytebase API. In similar ways, you could integrate Bytebase API into your existing DevOps platform to automate your schema change process, and benefit from Bytebase features such as [SQL Review](/sql-review/review-policy/) and [Custom Approval](/change-database/approval/).