> ## Documentation Index
> Fetch the complete documentation index at: https://docs.bytebase.com/llms.txt
> Use this file to discover all available pages before exploring further.
# Data Masking with Classification Levels
Bytebase is an open-source database DevSecOps solution for Developer, Security, DBA, and Platform Engineering teams. The GitLab for database DevSecOps.
This tutorial guides you through setting up data classification and masking using Bytebase's API.
By the end of this tutorial, you will have accomplished the following:
## Prerequisites
* Docker installed
* Download the [api-example repository](https://github.com/bytebase/example-api), you'll only need `data-classification` folder for this tutorial
## Overview
This demo app simulates the process of fetching data from databases connected to Bytebase and setting classification levels. By integrating global masking configurations, different classification levels will correspond to varying degrees of data masking.
## Workflow
1. Run a Bytebase workspace and add a service account user
2. Import the classification
3. Configure the data masking based on the classification level
4. Configure the environment variables and run the demo app
5. In the demo set the classification and see the data masking result
### Run a Bytebase workspace and add a service account user
1. Start Bytebase via Docker and register an account which will be granted `Workspace Admin` role.
```bash theme={null}
docker run --rm --init \
--name bytebase \
--publish 8080:8080 --pull always \
--volume ~/.bytebase/data:/var/opt/bytebase \
bytebase/bytebase:latest
```
You'll need an API service account user too:
2. Go to **IAM\&Admin > Users\&Groups**, click **+Add User**.
3. Choose `Service Account` as the **Type**, fill in the **Email** with `api-sample@service.bytebase.com`, choose `Workspace DBA` as **Roles**, and click **Confirm**.
4. Copy the **Service Key** for later use.
### Import the classification
1. Go to **Data Access > Data Classification**, click **Upload classification**.
2. Upload the `/public/classification.json` file within the `data-classification` repository, you'll see the classification is imported.
### Configure the data masking based on the classification level
There are two ways to configure the data masking based on the classification level - via UI and API:
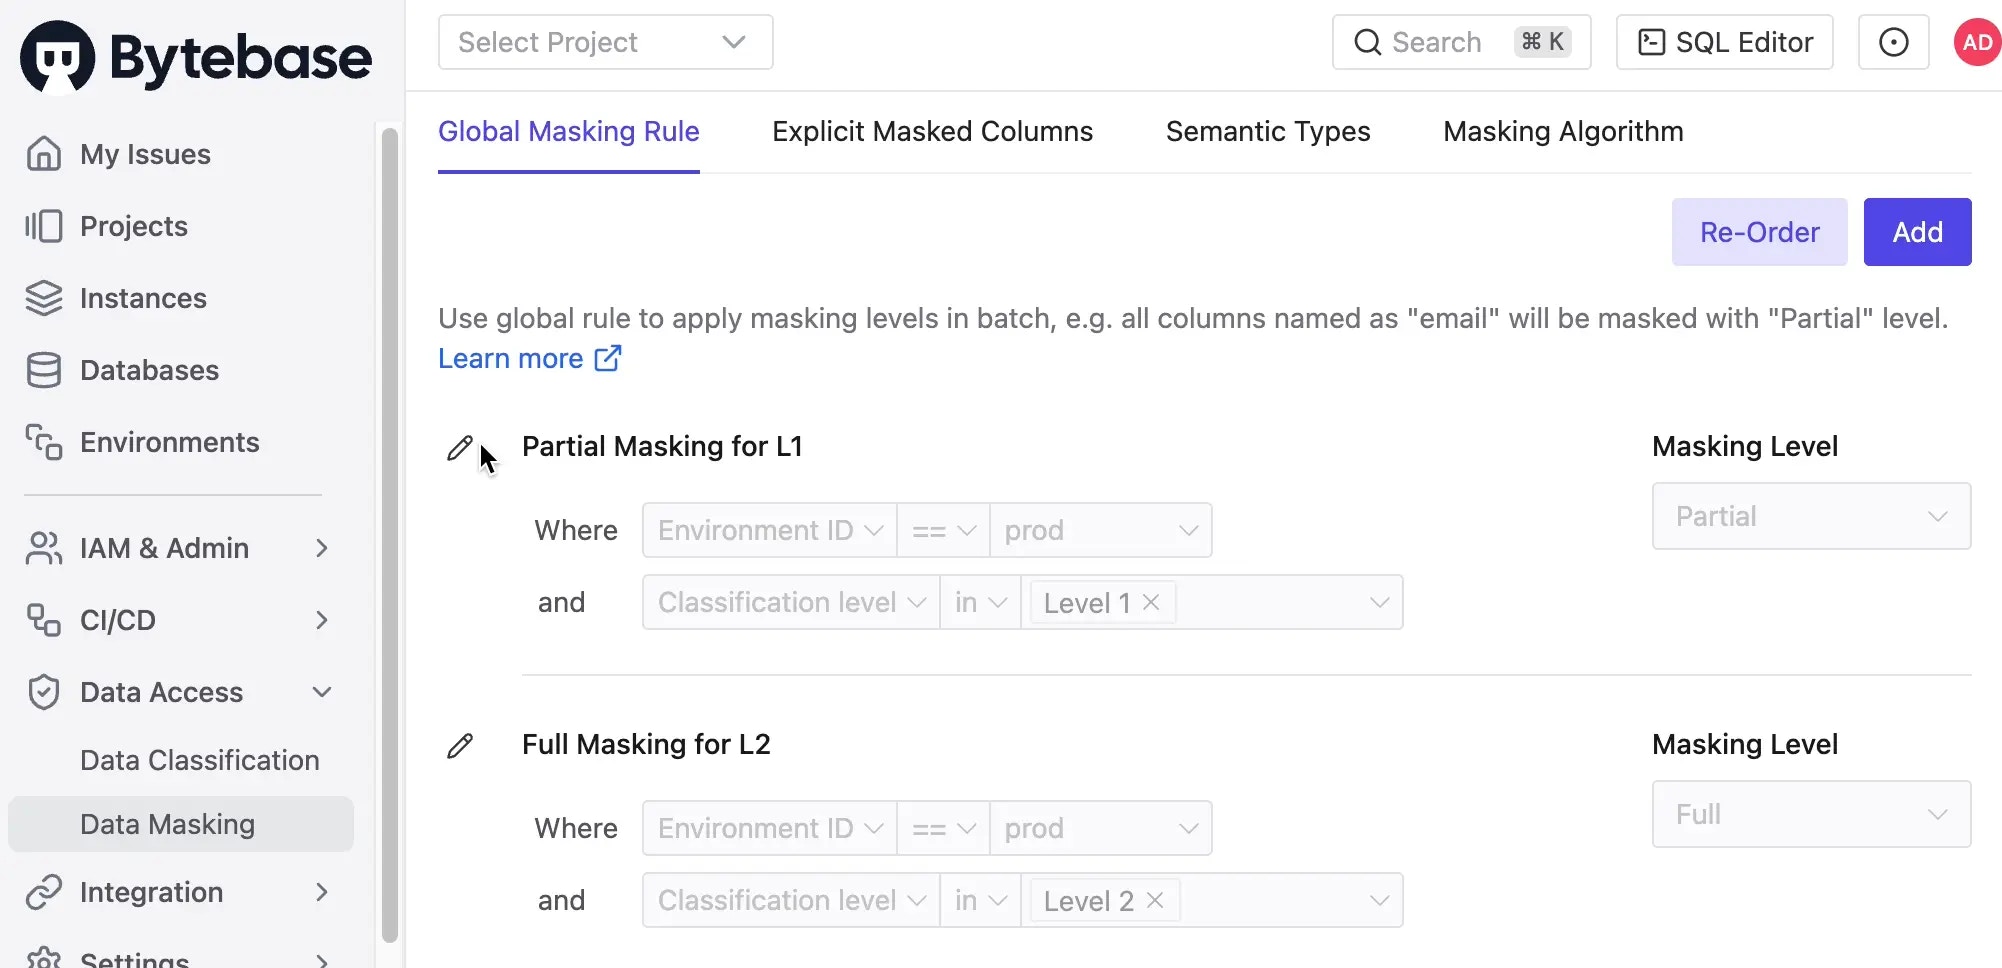
#### UI
1. Go to **Data Access > Data Masking**, click **Add**.
2. Give it a **Condition Name**, e.g. `Partial masking for Level 1`, click **Add Condition**.
3. Here we only care about data on production environment, so we set the **Environment ID** equals `prod`.
4. Add another condition with `AND` operator, and set the **Classification Level** in `Level 1`.
5. Choose **Masking Level** as `Partial` and click **Confirm**.
6. The same way, we can add another masking rule for `Level 2` with **Masking Level** as `Full`.
#### API
1. Find the [data masking configuration file](https://github.com/bytebase/example-api/blob/main/data-security/masking/global-masking-rule.json) within the `data-security` repository.
2. Generate the token for the service account user:
```bash theme={null}
export bytebase_url=http://localhost:8080
bytebase_account="api-sample@service.bytebase.com"
bytebase_password="bbs_bxxxxxxxxxoUxfY"
bytebase_token=$(curl -v ${bytebase_url}/v1/auth/login \
--data-raw '{"email":"'${bytebase_account}'","password":"'${bytebase_password}'"}' \ --compressed 2>&1 | grep token | grep -o 'access-token=[^;]*;' | grep -o '[^;]*' | sed 's/access-token=//g; s/;//g')
echo $bytebase_token
```
3. Import the data masking configuration:
```bash theme={null}
curl --request PATCH "${bytebase_url}/v1/policies/masking_rule?allow_missing=true&update_mask=payload" \
--header 'Authorization: Bearer '${bytebase_token} \
--data @global-masking-rule.json
```
4. Login to Bytebase console and go to **Data Access > Data Masking**, you'll see the data masking is configured.
### Configure the environment variables and run the `data-classification` demo app
1. Go to the `data-classification` folder of the `api-example` repository, and copy `env-template.local` file as `.env.local`. Replace the placeholders with yours.
```javascript theme={null}
NEXT_PUBLIC_BB_HOST=http://localhost:8080
NEXT_PUBLIC_BB_SERVICE_ACCOUNT=api-sample@service.bytebase.com
NEXT_PUBLIC_BB_SERVICE_KEY=bbs_xxxxxxxxxxxWUrDf
```
2. Run `pnpm i` and `pnpm run dev`, you can run the demo app locally with `localhost:3000`.
### Set the classification and see the data masking result
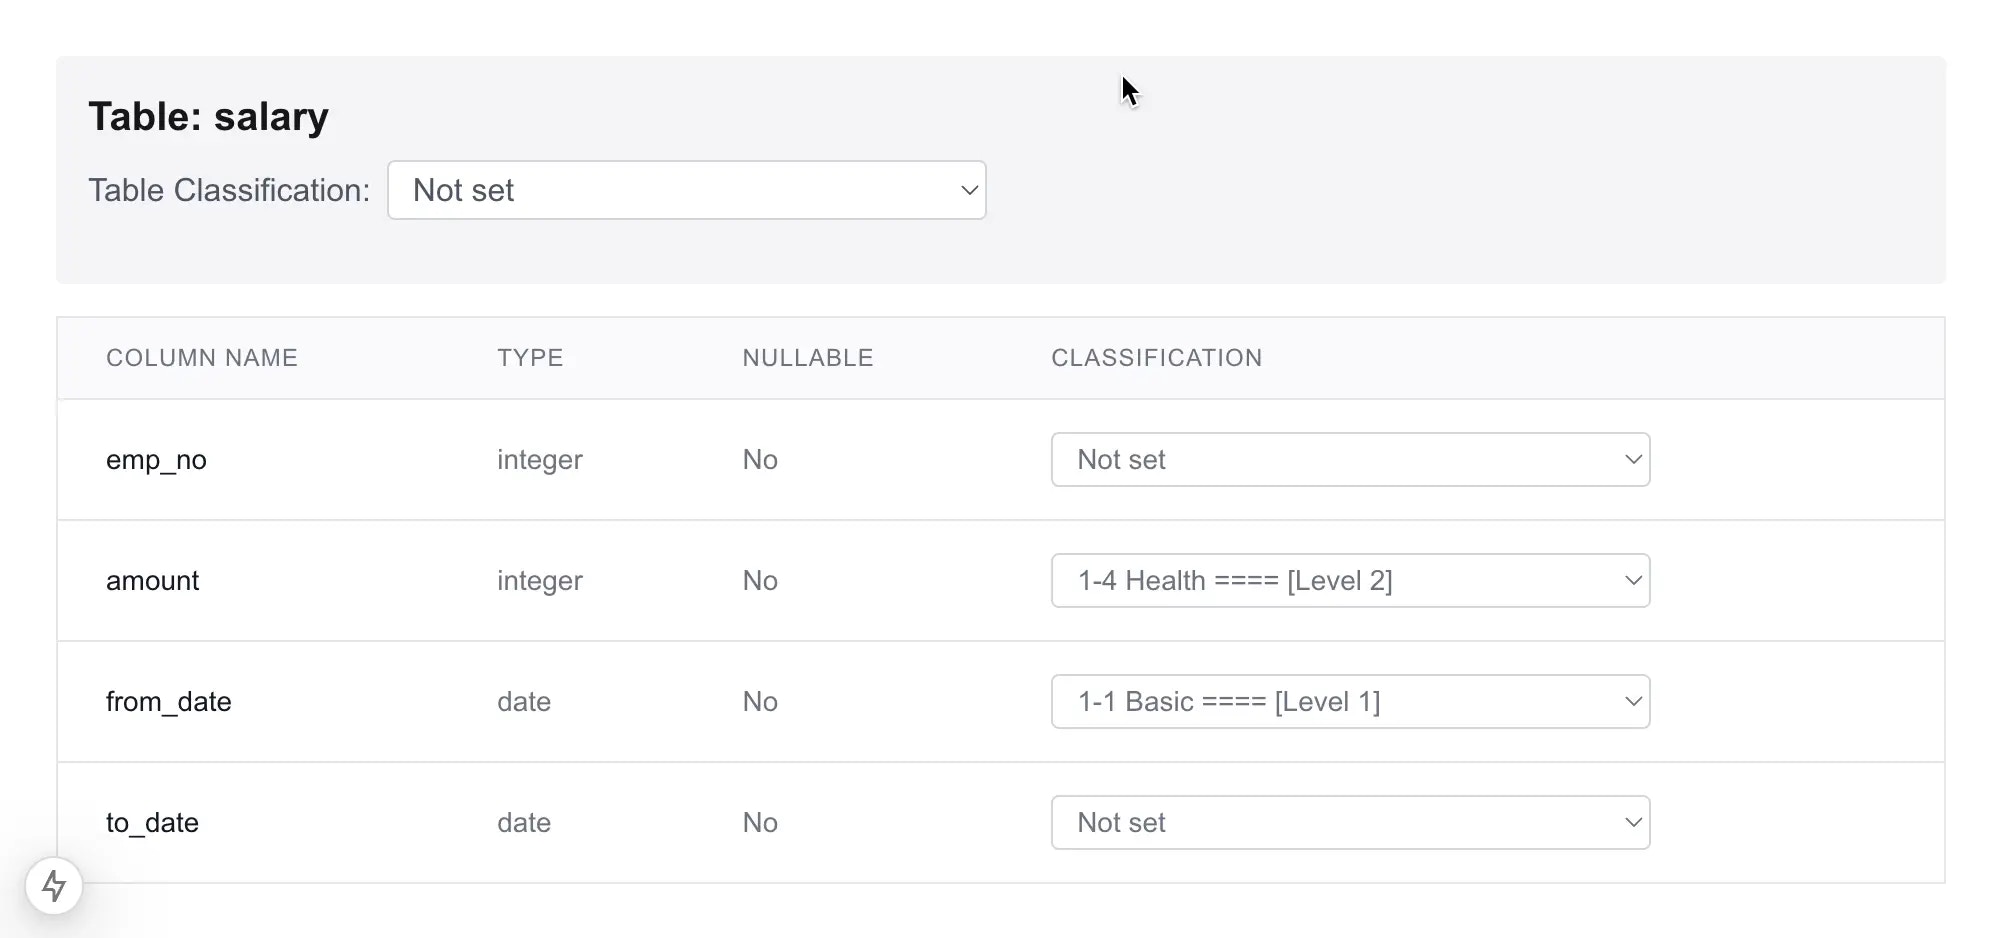
1. In the demo app, select a table, here we select `salary`, it's possible to set the classification level for this table, but here we skip it.
2. Choose classification `1-4 Health [Level 2]` for the `amount` column and `1-1 Basic [Level 1]` for the `from_date` column.
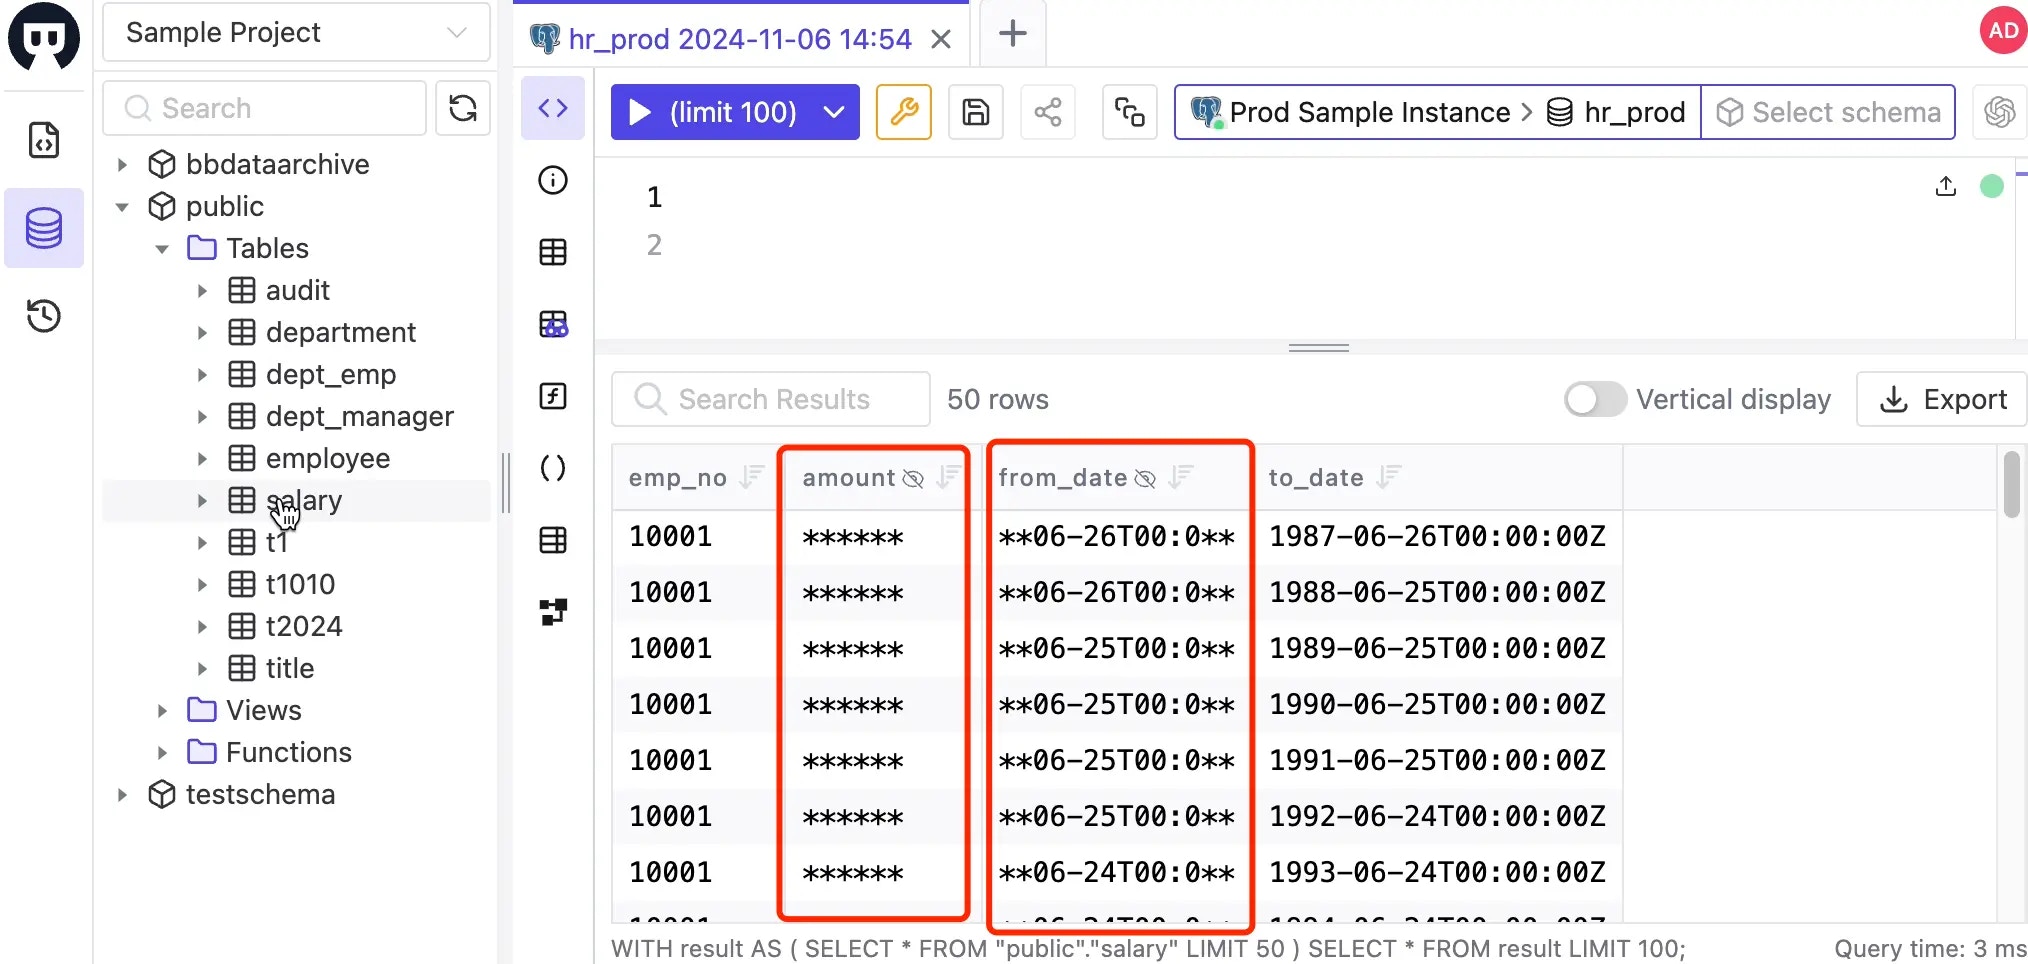
3. Go to Bytebase SQL Editor, double click the `salary` table, you'll see the data is masked accordingly.
## Code explanation
### Fetch database schema and classification
1. Bytebase provides the possibility to set classification on the table and column level. So the first step is to fetch the database schema.
2. Use the API `/v1/instances/${instance}/databases/${database}/metadata` to fetch the database schema information. In this demo, the instance is hardcoded as `test-sample-instance` and the database is `test-sample-database`.
```javascript theme={null}
const instance = 'prod-sample-instance';
const database = 'hr_prod';
const response = await fetch(
`${process.env.NEXT_PUBLIC_BB_HOST}/v1/instances/${instance}/databases/${database}/metadata`,
{
method: 'GET',
headers: {
'Content-Type': 'application/json',
Authorization: 'Bearer ' + token,
},
cache: 'no-store',
},
);
```
3. The metadata response includes the database schema under `schemas`:
```javascript theme={null}
"schemas": [
{
"name": "public",
"tables": [
{
"name": "dept_emp",
"columns": [
{
"name": "emp_no",
"position": 1,
"hasDefault": false,
"onUpdate": "",
"nullable": false,
"type": "integer",
"characterSet": "",
"collation": "",
"comment": "",
"userComment": "",
"effectiveMaskingLevel": "MASKING_LEVEL_UNSPECIFIED",
"generation": null
},
{
"name": "dept_no",
"position": 2,
"hasDefault": false,
"onUpdate": "",
"nullable": false,
"type": "text",
"characterSet": "",
"collation": "",
"comment": "",
"userComment": "",
"effectiveMaskingLevel": "MASKING_LEVEL_UNSPECIFIED",
"generation": null
},
...
]
}
...
]
}
]
```
Meanwhile, it also includes the classification information under `schemaConfigs`:
```javascript theme={null}
"schemaConfigs": [
{
"name": "public",
"tableConfigs": [
{
"name": "employee",
"columnConfigs": [
{
"name": "birth_date",
"semanticTypeId": "",
"labels": {},
"classificationId": "1-3"
},
{
"name": "emp_no",
"semanticTypeId": "",
"labels": {},
"classificationId": "1-1"
}
],
"classificationId": "",
"updater": "",
"sourceBranch": "",
"updateTime": null
}
],
"functionConfigs": [],
"procedureConfigs": [],
"viewConfigs": []
}
]
...
```
### Update the schema with classification
1. To update the schema with classification, we need to use the API `/v1/instances/${instance}/databases/${database}/metadata` with `PATCH` method.
```javascript theme={null}
const response = await fetch(
`${process.env.NEXT_PUBLIC_BB_HOST}/v1/instances/${instance}/databases/${database}/metadata`,
{
method: 'PATCH',
headers: {
'Content-Type': 'application/json',
Authorization: 'Bearer ' + token,
},
body: JSON.stringify(req),
cache: 'no-store',
},
);
```
### Fetch defined classification
1. Log in Bytebase, go to **Data Access > Data Classification**. Upload the `classification.json` file. It will be parsed and saved as global classification.
2. Use the API `/v1/settings/bb.workspace.data-classification` to fetch the defined classification, so it's always up to date.
## Summary
Setting up data classification and masking with Bytebase via API is a powerful way to manage sensitive data across your organization. This approach ensures that sensitive data is protected according to your organization's security policies, while still allowing authorized users to access the data they need.
 #### API
1. Find the [data masking configuration file](https://github.com/bytebase/example-api/blob/main/data-security/masking/global-masking-rule.json) within the `data-security` repository.
2. Generate the token for the service account user:
```bash theme={null}
export bytebase_url=http://localhost:8080
bytebase_account="api-sample@service.bytebase.com"
bytebase_password="bbs_bxxxxxxxxxoUxfY"
bytebase_token=$(curl -v ${bytebase_url}/v1/auth/login \
--data-raw '{"email":"'${bytebase_account}'","password":"'${bytebase_password}'"}' \ --compressed 2>&1 | grep token | grep -o 'access-token=[^;]*;' | grep -o '[^;]*' | sed 's/access-token=//g; s/;//g')
echo $bytebase_token
```
3. Import the data masking configuration:
```bash theme={null}
curl --request PATCH "${bytebase_url}/v1/policies/masking_rule?allow_missing=true&update_mask=payload" \
--header 'Authorization: Bearer '${bytebase_token} \
--data @global-masking-rule.json
```
4. Login to Bytebase console and go to **Data Access > Data Masking**, you'll see the data masking is configured.
### Configure the environment variables and run the `data-classification` demo app
1. Go to the `data-classification` folder of the `api-example` repository, and copy `env-template.local` file as `.env.local`. Replace the placeholders with yours.
```javascript theme={null}
NEXT_PUBLIC_BB_HOST=http://localhost:8080
NEXT_PUBLIC_BB_SERVICE_ACCOUNT=api-sample@service.bytebase.com
NEXT_PUBLIC_BB_SERVICE_KEY=bbs_xxxxxxxxxxxWUrDf
```
2. Run `pnpm i` and `pnpm run dev`, you can run the demo app locally with `localhost:3000`.
### Set the classification and see the data masking result
1. In the demo app, select a table, here we select `salary`, it's possible to set the classification level for this table, but here we skip it.
2. Choose classification `1-4 Health [Level 2]` for the `amount` column and `1-1 Basic [Level 1]` for the `from_date` column.
#### API
1. Find the [data masking configuration file](https://github.com/bytebase/example-api/blob/main/data-security/masking/global-masking-rule.json) within the `data-security` repository.
2. Generate the token for the service account user:
```bash theme={null}
export bytebase_url=http://localhost:8080
bytebase_account="api-sample@service.bytebase.com"
bytebase_password="bbs_bxxxxxxxxxoUxfY"
bytebase_token=$(curl -v ${bytebase_url}/v1/auth/login \
--data-raw '{"email":"'${bytebase_account}'","password":"'${bytebase_password}'"}' \ --compressed 2>&1 | grep token | grep -o 'access-token=[^;]*;' | grep -o '[^;]*' | sed 's/access-token=//g; s/;//g')
echo $bytebase_token
```
3. Import the data masking configuration:
```bash theme={null}
curl --request PATCH "${bytebase_url}/v1/policies/masking_rule?allow_missing=true&update_mask=payload" \
--header 'Authorization: Bearer '${bytebase_token} \
--data @global-masking-rule.json
```
4. Login to Bytebase console and go to **Data Access > Data Masking**, you'll see the data masking is configured.
### Configure the environment variables and run the `data-classification` demo app
1. Go to the `data-classification` folder of the `api-example` repository, and copy `env-template.local` file as `.env.local`. Replace the placeholders with yours.
```javascript theme={null}
NEXT_PUBLIC_BB_HOST=http://localhost:8080
NEXT_PUBLIC_BB_SERVICE_ACCOUNT=api-sample@service.bytebase.com
NEXT_PUBLIC_BB_SERVICE_KEY=bbs_xxxxxxxxxxxWUrDf
```
2. Run `pnpm i` and `pnpm run dev`, you can run the demo app locally with `localhost:3000`.
### Set the classification and see the data masking result
1. In the demo app, select a table, here we select `salary`, it's possible to set the classification level for this table, but here we skip it.
2. Choose classification `1-4 Health [Level 2]` for the `amount` column and `1-1 Basic [Level 1]` for the `from_date` column.
 3. Go to Bytebase SQL Editor, double click the `salary` table, you'll see the data is masked accordingly.
 ## Code explanation
### Fetch database schema and classification
1. Bytebase provides the possibility to set classification on the table and column level. So the first step is to fetch the database schema.
2. Use the API `/v1/instances/${instance}/databases/${database}/metadata` to fetch the database schema information. In this demo, the instance is hardcoded as `test-sample-instance` and the database is `test-sample-database`.
```javascript theme={null}
const instance = 'prod-sample-instance';
const database = 'hr_prod';
const response = await fetch(
`${process.env.NEXT_PUBLIC_BB_HOST}/v1/instances/${instance}/databases/${database}/metadata`,
{
method: 'GET',
headers: {
'Content-Type': 'application/json',
Authorization: 'Bearer ' + token,
},
cache: 'no-store',
},
);
```
3. The metadata response includes the database schema under `schemas`:
```javascript theme={null}
"schemas": [
{
"name": "public",
"tables": [
{
"name": "dept_emp",
"columns": [
{
"name": "emp_no",
"position": 1,
"hasDefault": false,
"onUpdate": "",
"nullable": false,
"type": "integer",
"characterSet": "",
"collation": "",
"comment": "",
"userComment": "",
"effectiveMaskingLevel": "MASKING_LEVEL_UNSPECIFIED",
"generation": null
},
{
"name": "dept_no",
"position": 2,
"hasDefault": false,
"onUpdate": "",
"nullable": false,
"type": "text",
"characterSet": "",
"collation": "",
"comment": "",
"userComment": "",
"effectiveMaskingLevel": "MASKING_LEVEL_UNSPECIFIED",
"generation": null
},
...
]
}
...
]
}
]
```
Meanwhile, it also includes the classification information under `schemaConfigs`:
```javascript theme={null}
"schemaConfigs": [
{
"name": "public",
"tableConfigs": [
{
"name": "employee",
"columnConfigs": [
{
"name": "birth_date",
"semanticTypeId": "",
"labels": {},
"classificationId": "1-3"
},
{
"name": "emp_no",
"semanticTypeId": "",
"labels": {},
"classificationId": "1-1"
}
],
"classificationId": "",
"updater": "",
"sourceBranch": "",
"updateTime": null
}
],
"functionConfigs": [],
"procedureConfigs": [],
"viewConfigs": []
}
]
...
```
### Update the schema with classification
1. To update the schema with classification, we need to use the API `/v1/instances/${instance}/databases/${database}/metadata` with `PATCH` method.
```javascript theme={null}
const response = await fetch(
`${process.env.NEXT_PUBLIC_BB_HOST}/v1/instances/${instance}/databases/${database}/metadata`,
{
method: 'PATCH',
headers: {
'Content-Type': 'application/json',
Authorization: 'Bearer ' + token,
},
body: JSON.stringify(req),
cache: 'no-store',
},
);
```
### Fetch defined classification
1. Log in Bytebase, go to **Data Access > Data Classification**. Upload the `classification.json` file. It will be parsed and saved as global classification.
2. Use the API `/v1/settings/bb.workspace.data-classification` to fetch the defined classification, so it's always up to date.
## Summary
Setting up data classification and masking with Bytebase via API is a powerful way to manage sensitive data across your organization. This approach ensures that sensitive data is protected according to your organization's security policies, while still allowing authorized users to access the data they need.
## Code explanation
### Fetch database schema and classification
1. Bytebase provides the possibility to set classification on the table and column level. So the first step is to fetch the database schema.
2. Use the API `/v1/instances/${instance}/databases/${database}/metadata` to fetch the database schema information. In this demo, the instance is hardcoded as `test-sample-instance` and the database is `test-sample-database`.
```javascript theme={null}
const instance = 'prod-sample-instance';
const database = 'hr_prod';
const response = await fetch(
`${process.env.NEXT_PUBLIC_BB_HOST}/v1/instances/${instance}/databases/${database}/metadata`,
{
method: 'GET',
headers: {
'Content-Type': 'application/json',
Authorization: 'Bearer ' + token,
},
cache: 'no-store',
},
);
```
3. The metadata response includes the database schema under `schemas`:
```javascript theme={null}
"schemas": [
{
"name": "public",
"tables": [
{
"name": "dept_emp",
"columns": [
{
"name": "emp_no",
"position": 1,
"hasDefault": false,
"onUpdate": "",
"nullable": false,
"type": "integer",
"characterSet": "",
"collation": "",
"comment": "",
"userComment": "",
"effectiveMaskingLevel": "MASKING_LEVEL_UNSPECIFIED",
"generation": null
},
{
"name": "dept_no",
"position": 2,
"hasDefault": false,
"onUpdate": "",
"nullable": false,
"type": "text",
"characterSet": "",
"collation": "",
"comment": "",
"userComment": "",
"effectiveMaskingLevel": "MASKING_LEVEL_UNSPECIFIED",
"generation": null
},
...
]
}
...
]
}
]
```
Meanwhile, it also includes the classification information under `schemaConfigs`:
```javascript theme={null}
"schemaConfigs": [
{
"name": "public",
"tableConfigs": [
{
"name": "employee",
"columnConfigs": [
{
"name": "birth_date",
"semanticTypeId": "",
"labels": {},
"classificationId": "1-3"
},
{
"name": "emp_no",
"semanticTypeId": "",
"labels": {},
"classificationId": "1-1"
}
],
"classificationId": "",
"updater": "",
"sourceBranch": "",
"updateTime": null
}
],
"functionConfigs": [],
"procedureConfigs": [],
"viewConfigs": []
}
]
...
```
### Update the schema with classification
1. To update the schema with classification, we need to use the API `/v1/instances/${instance}/databases/${database}/metadata` with `PATCH` method.
```javascript theme={null}
const response = await fetch(
`${process.env.NEXT_PUBLIC_BB_HOST}/v1/instances/${instance}/databases/${database}/metadata`,
{
method: 'PATCH',
headers: {
'Content-Type': 'application/json',
Authorization: 'Bearer ' + token,
},
body: JSON.stringify(req),
cache: 'no-store',
},
);
```
### Fetch defined classification
1. Log in Bytebase, go to **Data Access > Data Classification**. Upload the `classification.json` file. It will be parsed and saved as global classification.
2. Use the API `/v1/settings/bb.workspace.data-classification` to fetch the defined classification, so it's always up to date.
## Summary
Setting up data classification and masking with Bytebase via API is a powerful way to manage sensitive data across your organization. This approach ensures that sensitive data is protected according to your organization's security policies, while still allowing authorized users to access the data they need.