> ## Documentation Index
> Fetch the complete documentation index at: https://docs.bytebase.com/llms.txt
> Use this file to discover all available pages before exploring further.
# Embed SQL Editor in Your Internal Web Portal
Bytebase is an open-source database DevSecOps solution for Developer, Security, DBA, and Platform Engineering teams. The GitLab for database DevSecOps.
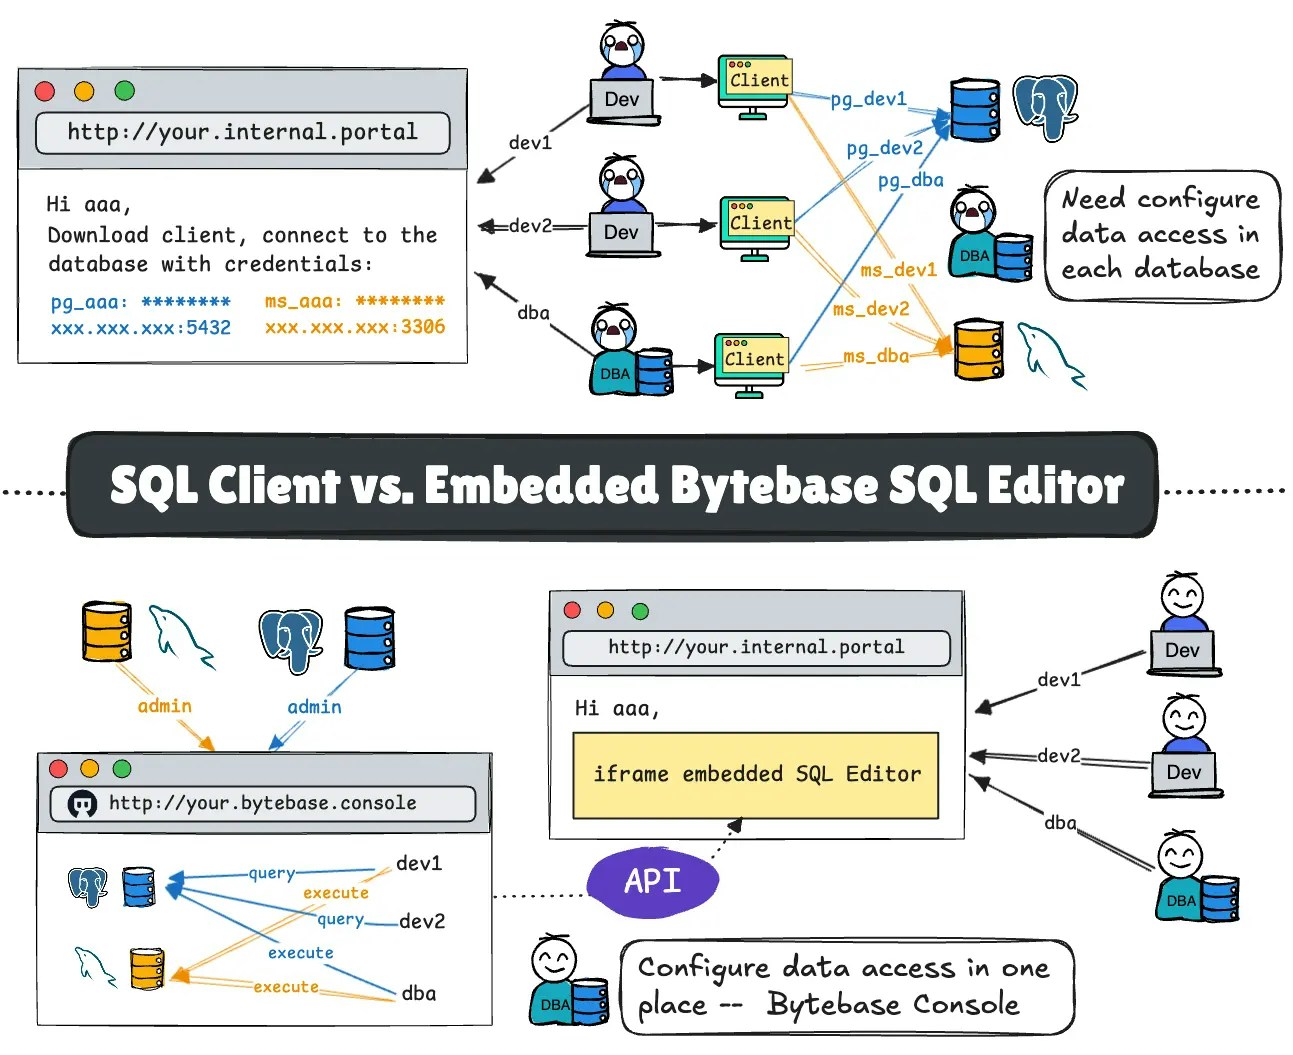
Bytebase has a web-based [SQL Editor](/sql-editor/overview), offering powerful features such as **centralized access control**, **data masking**, **audit logs**, **AI assistance**, and more.
You can also embed the Bytebase SQL Editor into your application. This tutorial will guide you through the process and show how to configure the settings using the Bytebase API.
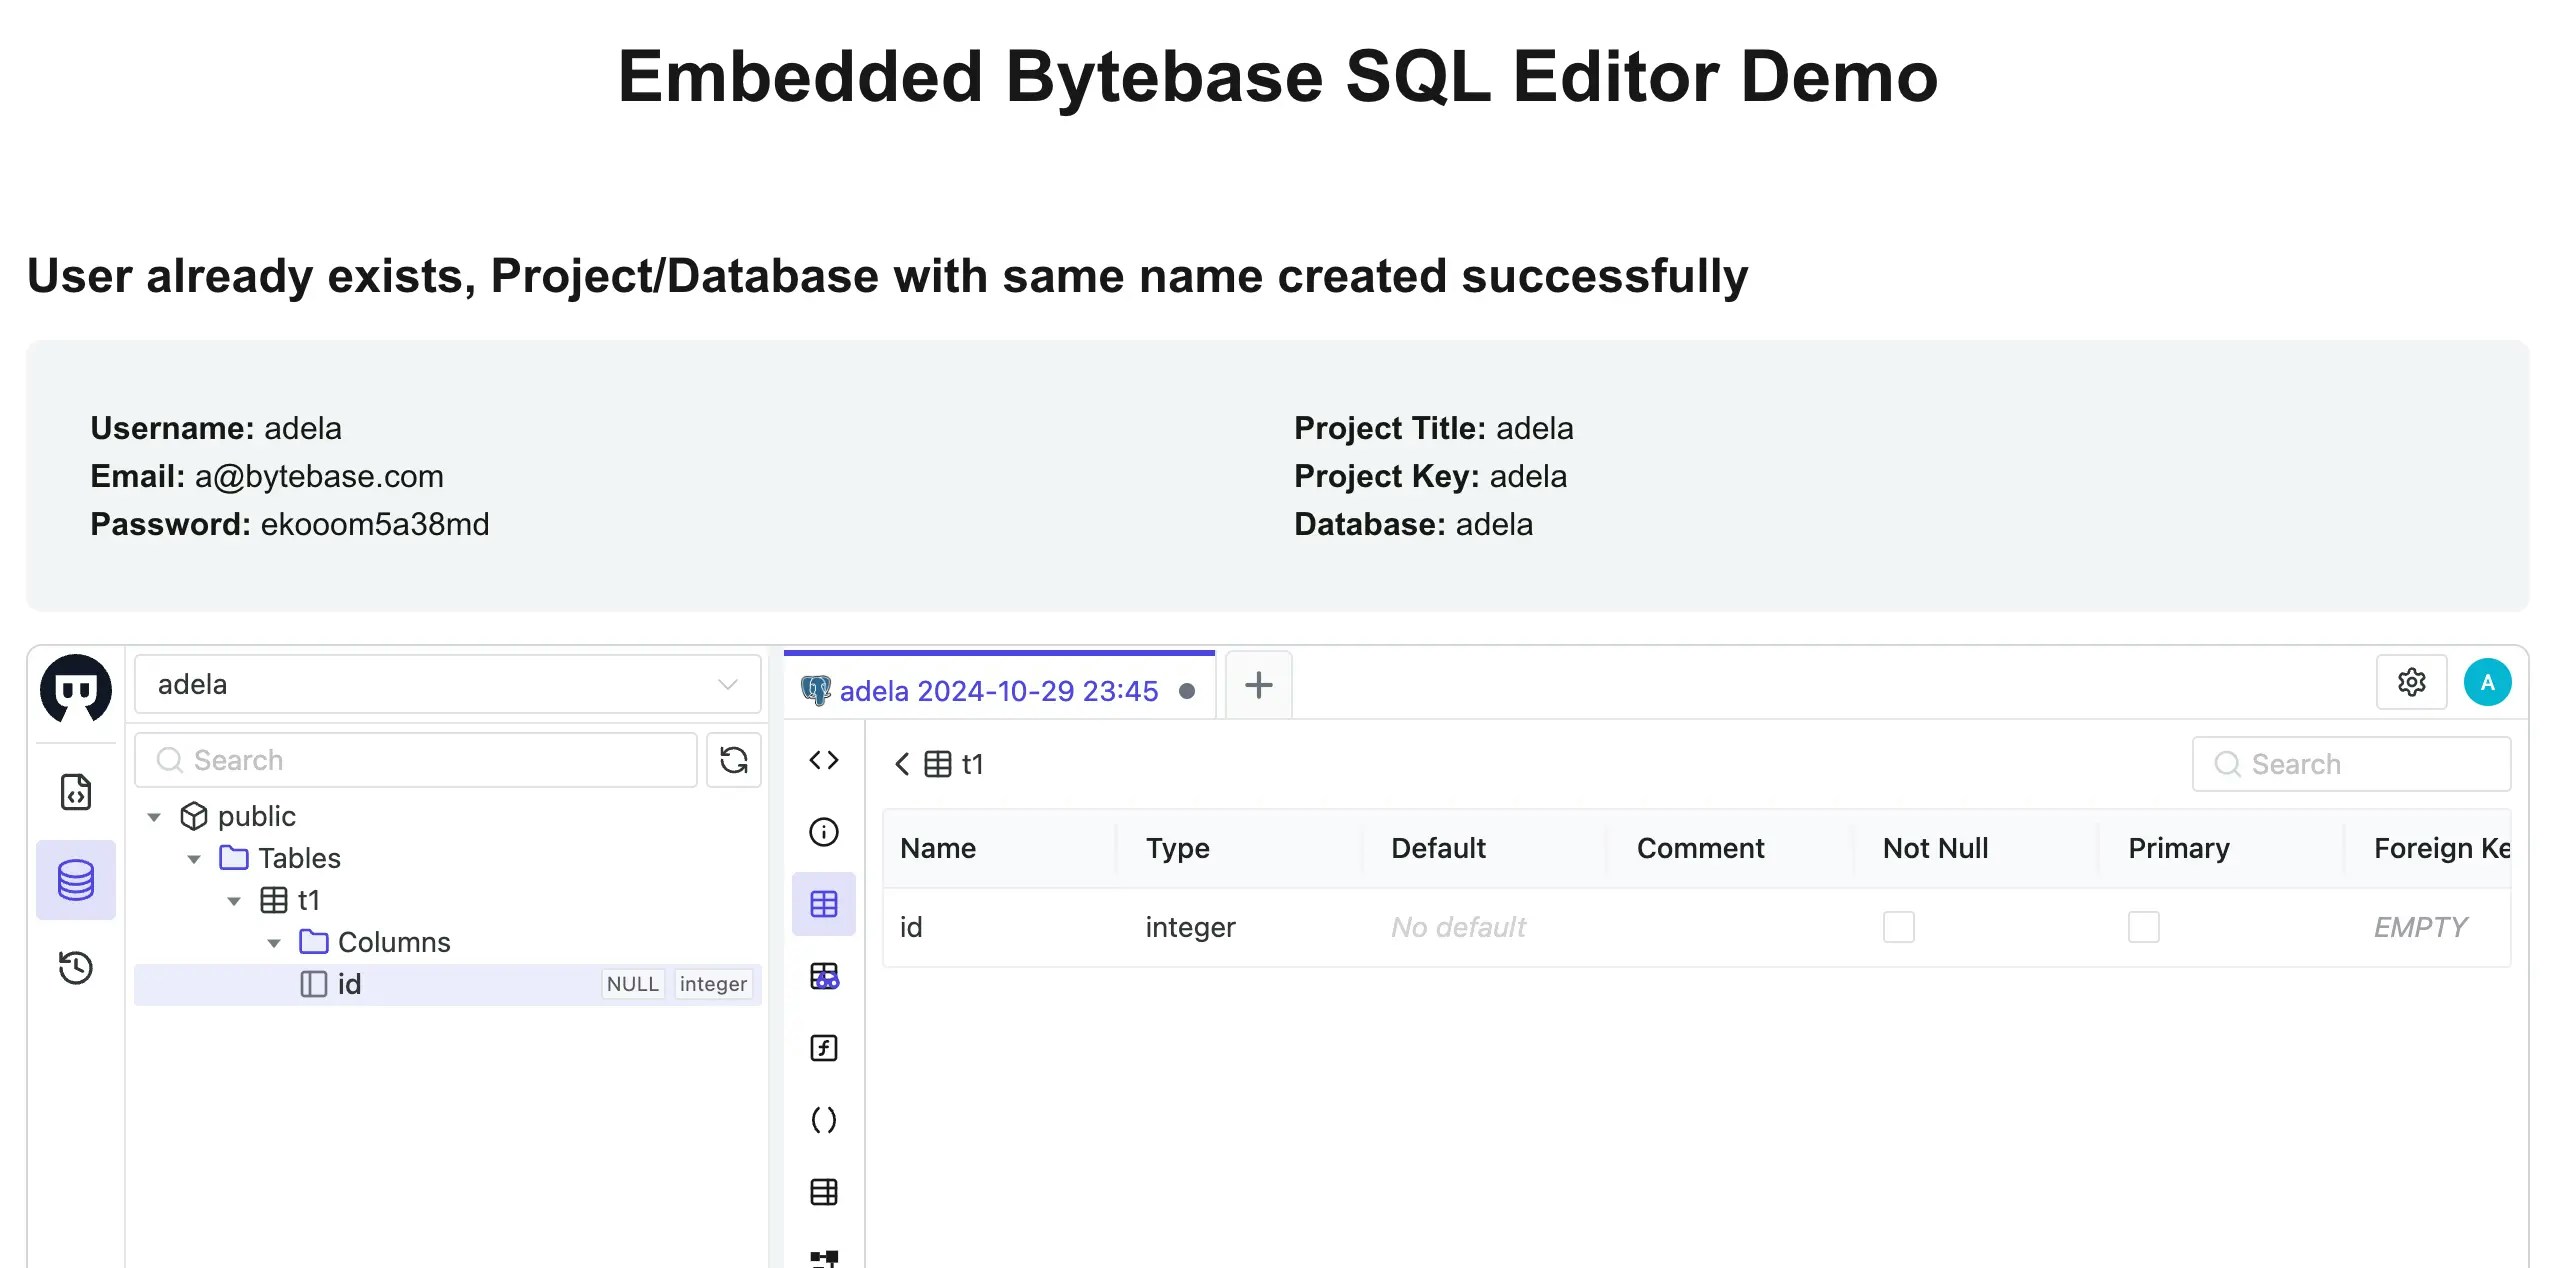
By the end of this tutorial, you will have achieved the following:
## Prerequisites
* A Google Cloud account
* Docker installed
* Download the [api-example repository](https://github.com/bytebase/example-api), you'll only need `sql-editor` folder for this tutorial
## Overview
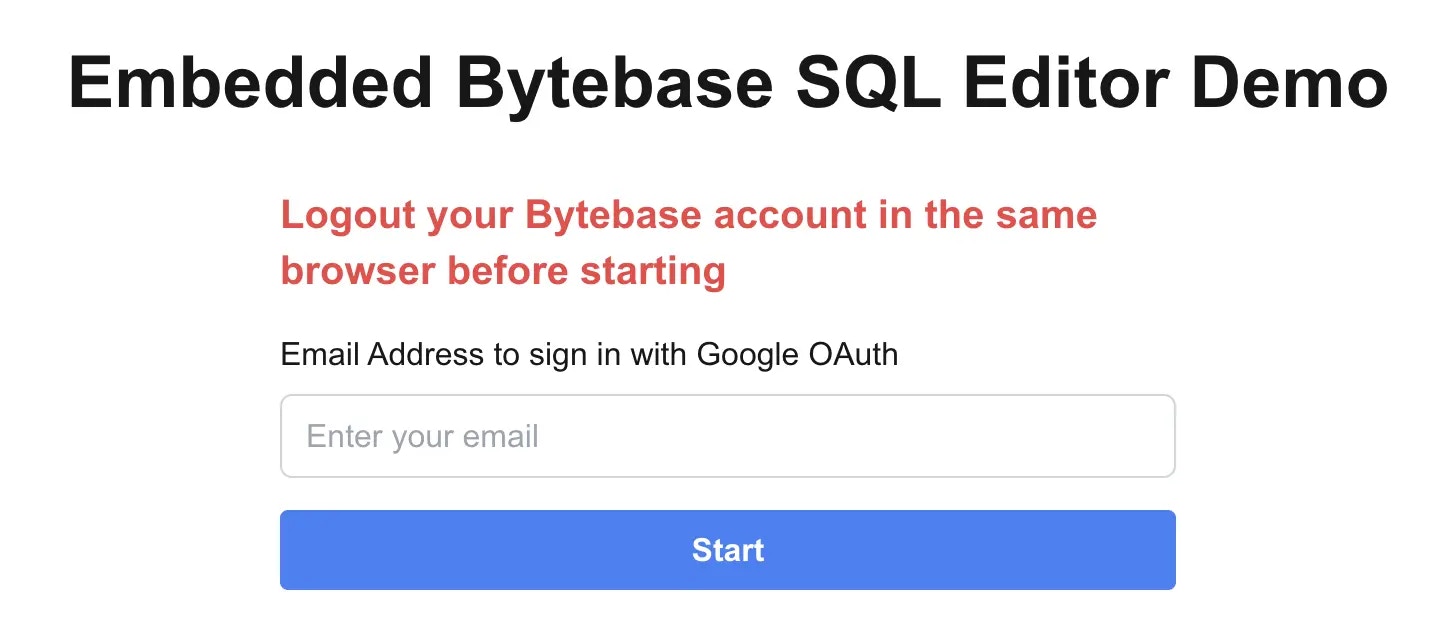
The demo app simulates the process of receiving your email from your internal portal. It then uses this email to authenticate via SSO with Bytebase and opens the Bytebase SQL Editor within an iframe.
Imagine you are a SaaS provider and you provision a separate database to store the data for each customer. Sometimes, you need your support team to query the customer database for troubleshooting. You want to embed SQL Editor into your internal support portal and grant query permission to the support team on demand.
## Workflow
Demo uses Google OAuth SSO for simplicity, you can choose other [SSO options](/administration/sso/overview/).
1. Setup Google OAuth
2. Run a Bytebase workspace and setup Google SSO
3. Configure the environment variables and run the `sql-editor` demo app
### Setup Google OAuth
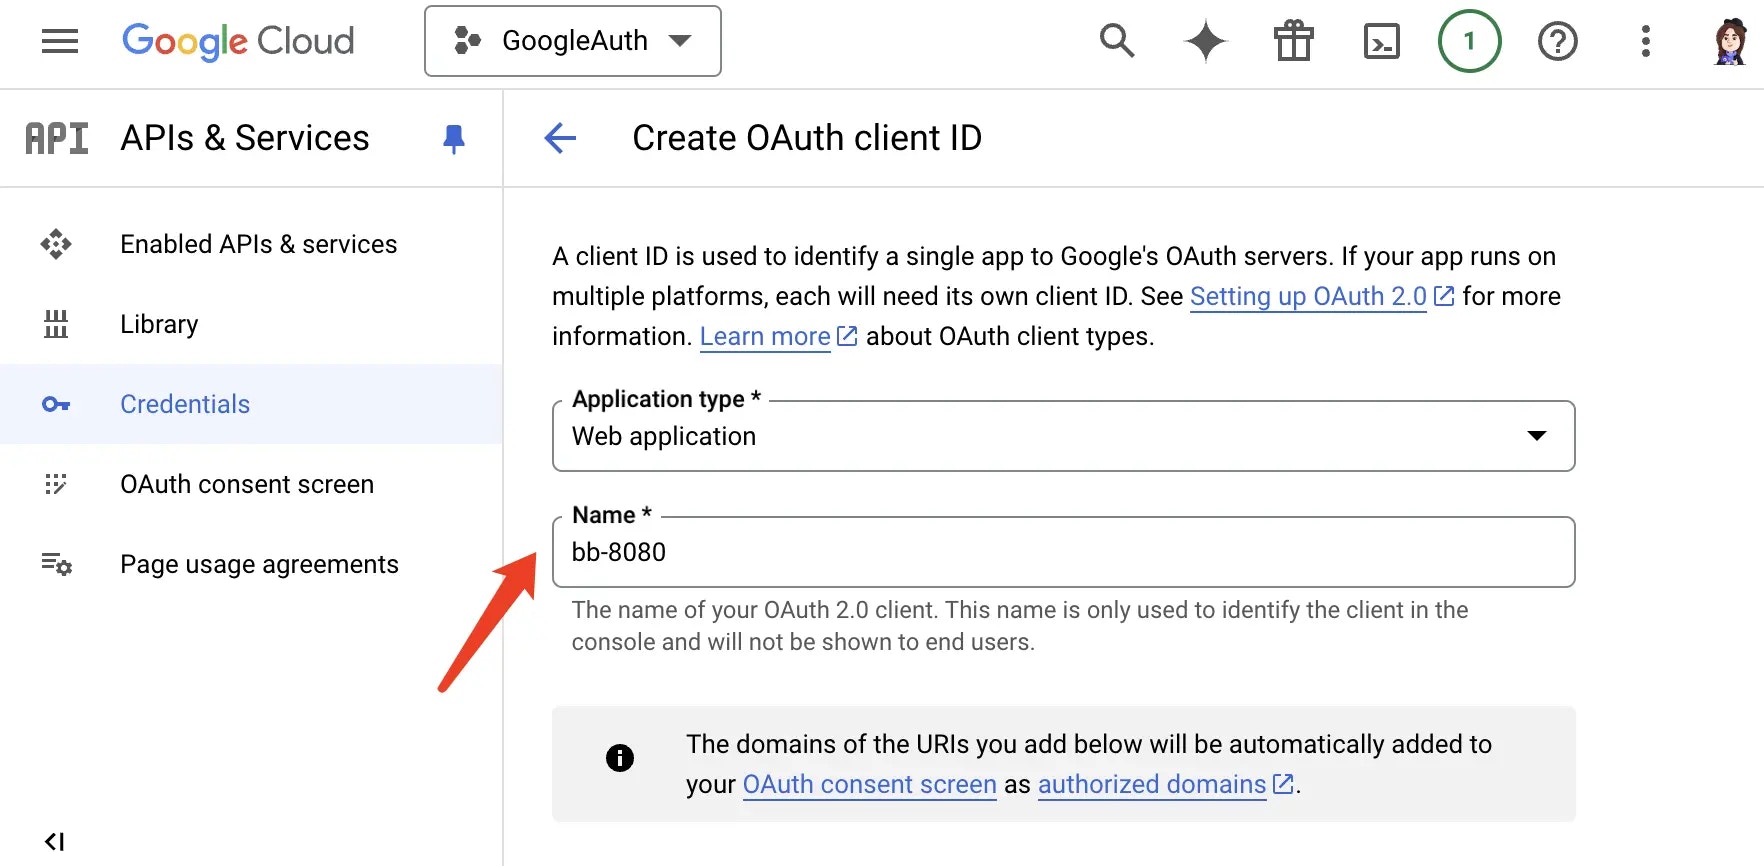
1. Go to [Google Cloud Console](https://console.cloud.google.com/), create a new project `GoogleAuth`, and then click **APIs & Services**.
2. On the left bar, click **Credentials**, then click **+CREATE CREDENTIALS**, and select **OAuth client ID**.
3. Choose `Web application` as the **Application type**, give it a **Name**.
4. For **Authorized redirect URIs**, add `http://localhost:8080/oauth/callback` and click **CREATE**.
5. Save the **Client ID** and **Client Secret** for later use.
### Run Bytebase, setup SSO and an admin user
1. Start Bytebase via Docker and register an account which will be granted `Workspace Admin` role.
```bash theme={null}
docker run --rm --init \
--name bytebase \
--publish 8080:8080 --pull always \
--volume ~/.bytebase/data:/var/opt/bytebase \
bytebase/bytebase:latest
```
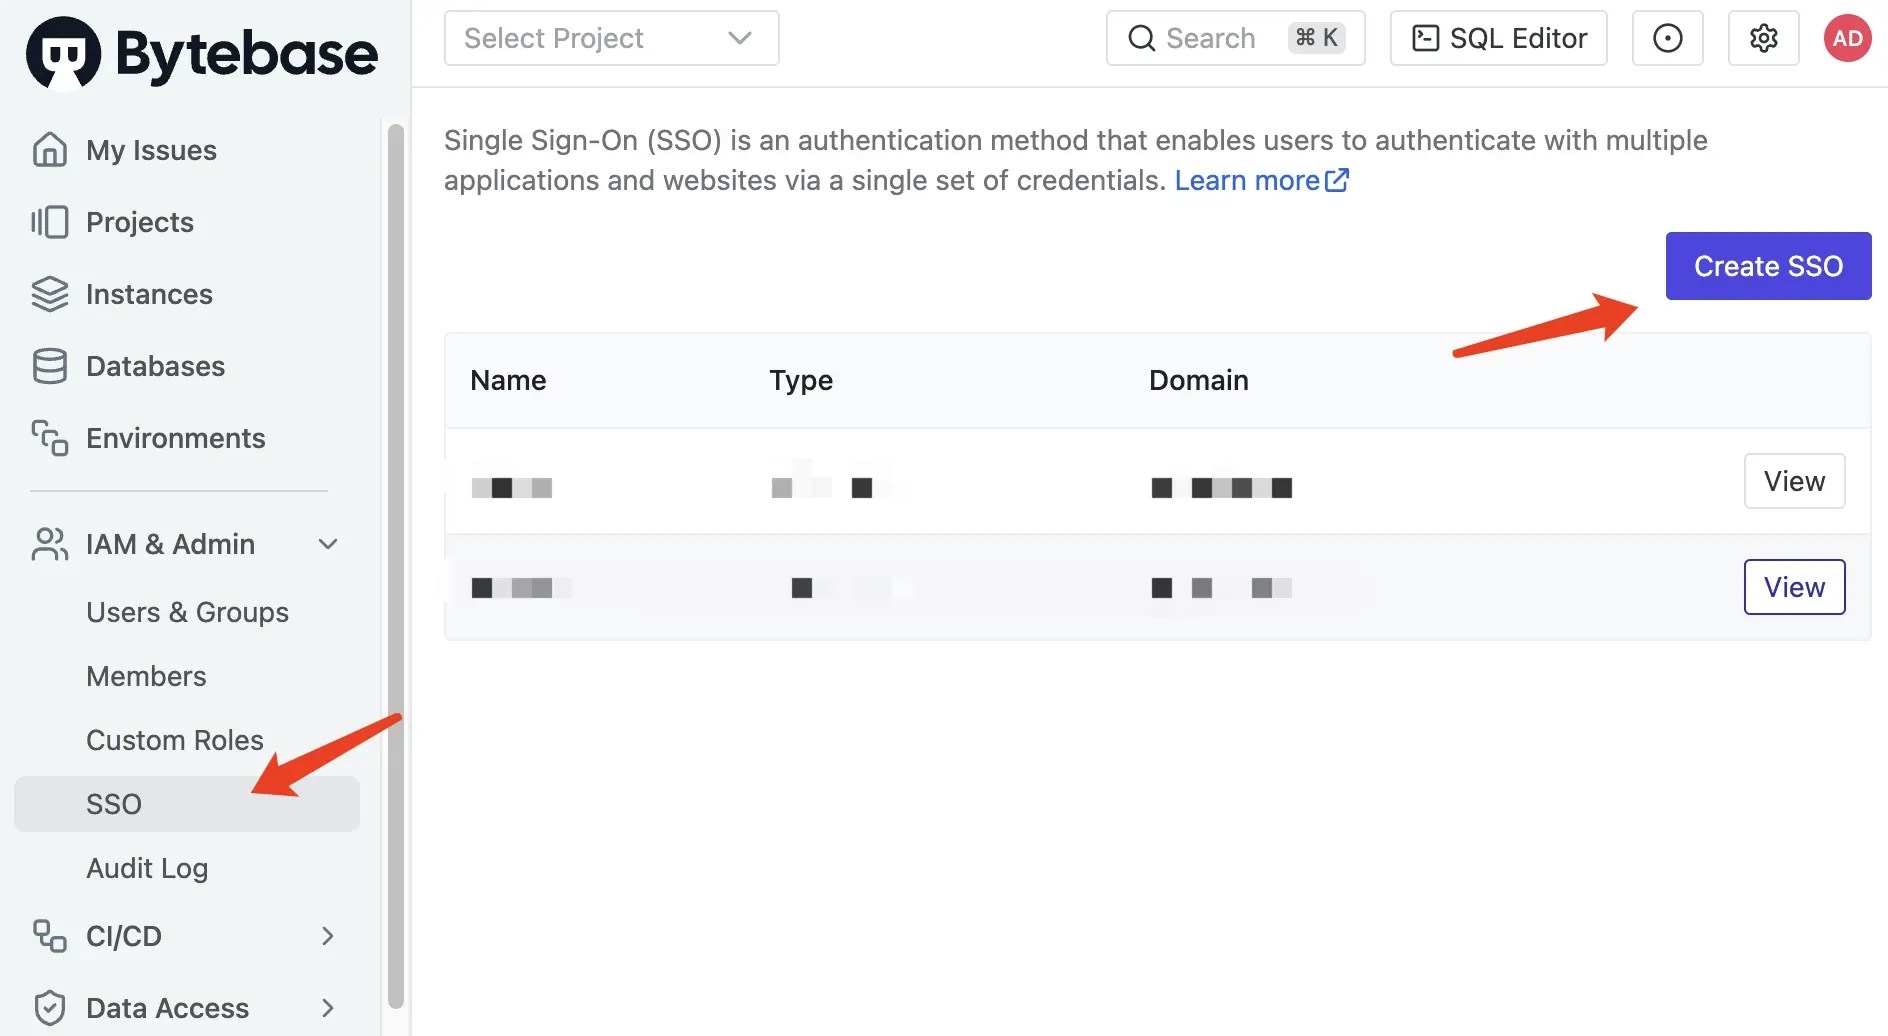
2. Log in to Bytebase, go to **IAM\&Admin > SSO**, click **Create SSO**.
3. Select `OAuth 2.0` as the **Type**, and `Google` used as the **template**.
4. Fill in the **Client ID** and **Client Secret**, which you can save from Google Cloud Console.
5. Click **Test Connection**, if it's successful, click **Create**.
You'll need an API service account user too:
1. Go to **IAM\&Admin > Users\&Groups**, click **+Add User**.
2. Choose `Service Account` as the **Type**, fill in the **Email** with `super-api@service.bytebase.com`, choose `Workspace Admin` as **Roles**, and click **Confirm**.
3. Copy the **Service Key** for later use.
### Configure the environment variables and run the `sql-editor` demo app
1. Go to the `sql-editor` folder of the `api-example` repository, and copy `env-template.local` file as `.env.local`. Replace the placeholders with yours.
```javascript theme={null}
NEXT_PUBLIC_BB_HOST=http://localhost:8080
NEXT_PUBLIC_BB_SERVICE_ACCOUNT=super-api@service.bytebase.com
NEXT_PUBLIC_BB_SERVICE_KEY=bbs_xfdsfdsafxxxxxxxfhui
NEXT_PUBLIC_BB_OAUTH_CLIENT_ID=12345-xxxxxxxxxxx.apps.googleusercontent.com
NEXT_PUBLIC_BB_OAUTH_CLIENT_CALLBACK_URL=http://localhost:8080/oauth/callback
```
2. Run `pnpm i` and `pnpm run dev`, you can run the demo app locally with `localhost:3000`.
## Code explanation
Due to security constraints, Google OAuth only permits the SQL Editor to be opened in an iframe by users who configure the OAuth in Google Cloud Console. This application is solely for demonstration purposes.
### Check user
1. The demo app receives your email from your internal portal.
2. It then uses that email to check if there is a Bytebase user with that email using the API `/v1/users/${email}`. If no user is found, it creates a new user with the email. The username is derived by removing the `@` and `.` symbols from the email.
```javascript theme={null}
const createUserResponse = await fetch(`${process.env.NEXT_PUBLIC_BB_HOST}/v1/users`, {
method: 'POST',
headers: {
'Content-Type': 'application/json',
Authorization: `Bearer ${token}`,
},
body: JSON.stringify({
title: username,
email: email,
password: password,
userType: 'USER',
state: 'ACTIVE',
}),
});
```
### Create project
It then use the username to check if there is a project with that name with the API `/v1/projects/${username}`, if there is no project, it'll create a new project with the username.
```javascript theme={null}
const createProjectResponse = await fetch(
`${process.env.NEXT_PUBLIC_BB_HOST}/v1/projects?projectId=${username}`,
{
method: 'POST',
headers: {
'Content-Type': 'application/json',
Authorization: `Bearer ${token}`,
},
body: JSON.stringify({
title: username,
key: username,
}),
},
);
```
### Create database
Within the project, it'll create a database with the username. The database will be created on Bytebase's embedded PostgreSQL instance `test-sample-instance`. First check if there is a database with that name using the API `/v1/instances/test-sample-instance/databases/${username}`, if no, it'll create a new database by creating an issue.
Typically, the issue creation process in Bytebase involves four steps: **sheet -> plan -> issue -> rollout**. However, for a database creation issue, it only includes three steps: **plan -> issue -> rollout**.
```javascript theme={null}
const newPlan = {
steps: [
{
specs: [
{
id: v4(),
create_database_config: {
target: `instances/test-sample-instance`,
database: project,
owner: 'bbsample',
characterSet: `UTF8`,
},
},
],
},
],
title: `Create database ${project}`,
description: 'Create a database',
};
```
```javascript theme={null}
const newIssue = {
approvers: [],
approvalTemplates: [],
subscribers: [],
title: `Create a empty database ${project}`,
description: `Create a database`,
type: 'DATABASE_CHANGE',
assignee: '',
plan: planName,
};
```
```javascript theme={null}
const newRollout = { plan: planName };
```
### Grant permission
Once the database is created, you must assign the necessary permissions to the user for database access. In this case, the user is granted the `Project Owner` role.
First, fetch the project IAM using the API `/v1/projects/${project}:getIamPolicy`. Then, add the new role to the array and update the IAM using the API `/v1/projects/${project}:setIamPolicy`.
```javascript theme={null}
response.bindings.push({
role: 'roles/projectOwner',
members: [`user:${email}`],
condition: {
expression: '',
title: '',
description: '',
location: '',
},
parsedExpr: null,
});
```
### Configure database change mode
To show the SQL Editor and allow editing directly instead of the issue system. You'll need to switch the workspace mode from **Issue** to **SQL Editor**:
```javascript theme={null}
const response = await fetchData(
`${process.env.NEXT_PUBLIC_BB_HOST}/v1/settings/bb.workspace.profile?updateMask=value.workspace_profile_setting_value.database_change_mode`,
token,
{
method: 'PATCH',
body: JSON.stringify({
value: {
workspaceProfileSettingValue: {
databaseChangeMode: 'EDITOR',
},
},
}),
},
);
```
***
After all this is done, the app will open the Bytebase workspace in an iframe with your SSO logged in credentials.
## Summary
Building a SQL Client is a no easy task. By embedding the Bytebase SQL Editor in your own internal portal,
your team doesn't need to reinvent the wheel and can enjoy all the powerful SQL Editor features Bytebase offers.
 By the end of this tutorial, you will have achieved the following:
## Prerequisites
* A Google Cloud account
* Docker installed
* Download the [api-example repository](https://github.com/bytebase/example-api), you'll only need `sql-editor` folder for this tutorial
## Overview
The demo app simulates the process of receiving your email from your internal portal. It then uses this email to authenticate via SSO with Bytebase and opens the Bytebase SQL Editor within an iframe.
Imagine you are a SaaS provider and you provision a separate database to store the data for each customer. Sometimes, you need your support team to query the customer database for troubleshooting. You want to embed SQL Editor into your internal support portal and grant query permission to the support team on demand.
## Workflow
By the end of this tutorial, you will have achieved the following:
## Prerequisites
* A Google Cloud account
* Docker installed
* Download the [api-example repository](https://github.com/bytebase/example-api), you'll only need `sql-editor` folder for this tutorial
## Overview
The demo app simulates the process of receiving your email from your internal portal. It then uses this email to authenticate via SSO with Bytebase and opens the Bytebase SQL Editor within an iframe.
Imagine you are a SaaS provider and you provision a separate database to store the data for each customer. Sometimes, you need your support team to query the customer database for troubleshooting. You want to embed SQL Editor into your internal support portal and grant query permission to the support team on demand.
## Workflow
 4. For **Authorized redirect URIs**, add `http://localhost:8080/oauth/callback` and click **CREATE**.
5. Save the **Client ID** and **Client Secret** for later use.
### Run Bytebase, setup SSO and an admin user
1. Start Bytebase via Docker and register an account which will be granted `Workspace Admin` role.
```bash theme={null}
docker run --rm --init \
--name bytebase \
--publish 8080:8080 --pull always \
--volume ~/.bytebase/data:/var/opt/bytebase \
bytebase/bytebase:latest
```
2. Log in to Bytebase, go to **IAM\&Admin > SSO**, click **Create SSO**.
4. For **Authorized redirect URIs**, add `http://localhost:8080/oauth/callback` and click **CREATE**.
5. Save the **Client ID** and **Client Secret** for later use.
### Run Bytebase, setup SSO and an admin user
1. Start Bytebase via Docker and register an account which will be granted `Workspace Admin` role.
```bash theme={null}
docker run --rm --init \
--name bytebase \
--publish 8080:8080 --pull always \
--volume ~/.bytebase/data:/var/opt/bytebase \
bytebase/bytebase:latest
```
2. Log in to Bytebase, go to **IAM\&Admin > SSO**, click **Create SSO**.
 3. Select `OAuth 2.0` as the **Type**, and `Google` used as the **template**.
4. Fill in the **Client ID** and **Client Secret**, which you can save from Google Cloud Console.
5. Click **Test Connection**, if it's successful, click **Create**.
You'll need an API service account user too:
1. Go to **IAM\&Admin > Users\&Groups**, click **+Add User**.
2. Choose `Service Account` as the **Type**, fill in the **Email** with `super-api@service.bytebase.com`, choose `Workspace Admin` as **Roles**, and click **Confirm**.
3. Copy the **Service Key** for later use.
### Configure the environment variables and run the `sql-editor` demo app
1. Go to the `sql-editor` folder of the `api-example` repository, and copy `env-template.local` file as `.env.local`. Replace the placeholders with yours.
```javascript theme={null}
NEXT_PUBLIC_BB_HOST=http://localhost:8080
NEXT_PUBLIC_BB_SERVICE_ACCOUNT=super-api@service.bytebase.com
NEXT_PUBLIC_BB_SERVICE_KEY=bbs_xfdsfdsafxxxxxxxfhui
NEXT_PUBLIC_BB_OAUTH_CLIENT_ID=12345-xxxxxxxxxxx.apps.googleusercontent.com
NEXT_PUBLIC_BB_OAUTH_CLIENT_CALLBACK_URL=http://localhost:8080/oauth/callback
```
2. Run `pnpm i` and `pnpm run dev`, you can run the demo app locally with `localhost:3000`.
3. Select `OAuth 2.0` as the **Type**, and `Google` used as the **template**.
4. Fill in the **Client ID** and **Client Secret**, which you can save from Google Cloud Console.
5. Click **Test Connection**, if it's successful, click **Create**.
You'll need an API service account user too:
1. Go to **IAM\&Admin > Users\&Groups**, click **+Add User**.
2. Choose `Service Account` as the **Type**, fill in the **Email** with `super-api@service.bytebase.com`, choose `Workspace Admin` as **Roles**, and click **Confirm**.
3. Copy the **Service Key** for later use.
### Configure the environment variables and run the `sql-editor` demo app
1. Go to the `sql-editor` folder of the `api-example` repository, and copy `env-template.local` file as `.env.local`. Replace the placeholders with yours.
```javascript theme={null}
NEXT_PUBLIC_BB_HOST=http://localhost:8080
NEXT_PUBLIC_BB_SERVICE_ACCOUNT=super-api@service.bytebase.com
NEXT_PUBLIC_BB_SERVICE_KEY=bbs_xfdsfdsafxxxxxxxfhui
NEXT_PUBLIC_BB_OAUTH_CLIENT_ID=12345-xxxxxxxxxxx.apps.googleusercontent.com
NEXT_PUBLIC_BB_OAUTH_CLIENT_CALLBACK_URL=http://localhost:8080/oauth/callback
```
2. Run `pnpm i` and `pnpm run dev`, you can run the demo app locally with `localhost:3000`.
 ## Code explanation
 ## Summary
Building a SQL Client is a no easy task. By embedding the Bytebase SQL Editor in your own internal portal,
your team doesn't need to reinvent the wheel and can enjoy all the powerful SQL Editor features Bytebase offers.
## Summary
Building a SQL Client is a no easy task. By embedding the Bytebase SQL Editor in your own internal portal,
your team doesn't need to reinvent the wheel and can enjoy all the powerful SQL Editor features Bytebase offers.