Jekyll2020-04-20T03:03:05+00:00https://tonydeep.github.io/feed.xmlTony Deep’s BlogsScience with a spirit of adventureTonyKhanhBlogging with Jupyter Notebooks2020-04-12T00:00:00+00:002020-04-12T00:00:00+00:00https://tonydeep.github.io/2020/04/12/blog_test<blockquote>
<p>With Notebooks, we can easily share prose, code, tables, charts, and more!</p>
</blockquote>
<!--more-->
<ul class="table-of-content" id="markdown-toc">
<li><a href="#writing-your-notebook" id="markdown-toc-writing-your-notebook">Writing your notebook</a></li>
<li><a href="#exporting-to-markdown" id="markdown-toc-exporting-to-markdown">Exporting to markdown</a></li>
</ul>
<p>Jupyter Notebooks is a great environment for creating blog posts. Or maybe you didn’t even plan to write a blog post, but you’ve done some interesting experiments and you realize afterwards that you have results worth sharing. Either way, you’ll want some way to get your Notebook onto your blog.</p>
<p><a href="https://www.fast.ai/2020/01/16/fast_template/">fast_template</a> and <a href="http://nbdev.fast.ai/">nbdev</a> are set up to handle Jupyter Notebooks nicely, so there’s not much you have to do to get this working. I’ll walk you through the steps here. Note that Jupyter Notebooks and GitHub Pages already have some support for exporting notebooks to markdown; but I suggest you use <code class="language-plaintext highlighter-rouge">fast_template</code> and <code class="language-plaintext highlighter-rouge">nbdev</code>, with the process described in this post, because otherwise you won’t get useful features such as:</p>
<ul>
<li>Support for pasting images directly into your notebook</li>
<li>Input and output cells clearly displayed with appropriate styles</li>
<li>The ability to hide some cells from the markdown output.</li>
</ul>
<p>This whole post was created using this method. You can see the source notebook here:</p>
<h2 id="writing-your-notebook">Writing your notebook</h2>
<p>Your markdown cells, code cells, and all outputs will appear in your exported blog post. The only thing that won’t be shown is interactive outputs (e.g. <code class="language-plaintext highlighter-rouge">ipywidgets</code>, bokeh plots, etc), or cells you explicitly hide using the <code class="language-plaintext highlighter-rouge">#hide</code> marker discussed below.</p>
<p>When you write your notebook, just write whatever you want your audience to see. Since most writing platforms make it much harder to include code and outputs, many of us are in a habit of including less real examples than we should. So try to get into a new habit of including lots of examples as you write.</p>
<p>Often you’ll want to hide boilerplate such as import statements. Add <code class="language-plaintext highlighter-rouge">#hide</code> to the top of any cell to make it not show up in output.</p>
<p>Jupyter displays the result of the last line of a cell, so there’s no need to include <code class="language-plaintext highlighter-rouge">print()</code>. (And including extra code that isn’t needed means there’s more cognitive overhead for the reader; so don’t include code that you don’t really need!)</p>
<div class="language-python highlighter-rouge"><div class="highlight"><pre class="highlight"><code><span class="mi">1</span><span class="o">+</span><span class="mi">1</span>
</code></pre></div></div>
<div class="language-plaintext highlighter-rouge"><div class="highlight"><pre class="highlight"><code>2
</code></pre></div></div>
<p>It works not just for text, but also for images:</p>
<div class="language-python highlighter-rouge"><div class="highlight"><pre class="highlight"><code><span class="n">Image</span><span class="o">.</span><span class="nb">open</span><span class="p">(</span><span class="s">'../fast.ai/images/fast_template/image2.png'</span><span class="p">)</span><span class="o">.</span><span class="n">flip_lr</span><span class="p">()</span>
</code></pre></div></div>
<p><img src="/assets/images/blog_test_files/output_6_0.png" alt="png" /></p>
<p>…and plots:</p>
<div class="language-python highlighter-rouge"><div class="highlight"><pre class="highlight"><code><span class="n">plt</span><span class="o">.</span><span class="n">plot</span><span class="p">([</span><span class="mi">1</span><span class="p">,</span><span class="mi">2</span><span class="p">]);</span>
</code></pre></div></div>
<p><img src="/assets/images/blog_test_files/output_8_0.png" alt="png" /></p>
<p>…and Pandas DataFrames, and much more!</p>
<div class="language-python highlighter-rouge"><div class="highlight"><pre class="highlight"><code><span class="n">pd</span><span class="o">.</span><span class="n">DataFrame</span><span class="p">({</span><span class="s">'a'</span><span class="p">:[</span><span class="mi">1</span><span class="p">,</span><span class="mi">2</span><span class="p">],</span> <span class="s">'b'</span><span class="p">:[</span><span class="mi">3</span><span class="p">,</span><span class="mi">4</span><span class="p">]})</span>
</code></pre></div></div>
<div>
<style scoped="">
.dataframe tbody tr th:only-of-type {
vertical-align: middle;
}
.dataframe tbody tr th {
vertical-align: top;
}
.dataframe thead th {
text-align: right;
}
</style>
<table border="1" class="dataframe">
<thead>
<tr style="text-align: right;">
<th></th>
<th>a</th>
<th>b</th>
</tr>
</thead>
<tbody>
<tr>
<th>0</th>
<td>1</td>
<td>3</td>
</tr>
<tr>
<th>1</th>
<td>2</td>
<td>4</td>
</tr>
</tbody>
</table>
</div>
<p>You can also paste images, such as screenshots, directly into a markdown cell in Jupyter. This creates a file embedded in the notebook that Jupyter calls an “attachment”. Or you can use Markdown to refer to an image on the internet by its URL.</p>
<p><img src="https://upload.wikimedia.org/wikipedia/commons/1/1b/Creative-Tail-Animal-dog.svg" alt="" /></p>
<h2 id="exporting-to-markdown">Exporting to markdown</h2>
<p>Before you export to markdown, you first need to make sure your notebook is saved, so press <code class="language-plaintext highlighter-rouge">s</code> or click <code class="language-plaintext highlighter-rouge">File</code>➡<code class="language-plaintext highlighter-rouge">Save</code>. Then close the browser tab with the open notebook. This is important, because when we export to markdown any attachments will be exported to files, and the notebook will be updated to refer to those external files. Therefore, the notebook itself will change; if you leave it open, you may accidentally end up overwriting the updated notebook.</p>
<p>You’ll need <code class="language-plaintext highlighter-rouge">nbdev</code> installed; if you haven’t already, then install it with:</p>
<div class="language-plaintext highlighter-rouge"><div class="highlight"><pre class="highlight"><code>pip install nbdev
</code></pre></div></div>
<p>Then, in your terminal, cd to the folder containing your notebook, and type (assuming your notebook is called <code class="language-plaintext highlighter-rouge">name.ipynb</code>):</p>
<div class="language-plaintext highlighter-rouge"><div class="highlight"><pre class="highlight"><code>nbdev_nb2md name.ipynb
</code></pre></div></div>
<p>You’ll see that a file <code class="language-plaintext highlighter-rouge">name.md</code> and folder <code class="language-plaintext highlighter-rouge">name_files</code> have been created (where “name” is replaced by your notebook file name). One problem is that the markdown exporter assumes your images will be in <code class="language-plaintext highlighter-rouge">name_files</code>, but on your blog they’ll be in <code class="language-plaintext highlighter-rouge">/images/name_files</code>. So we need to do a search and replace to fix this in the markdown file. We can do this automatically with python. Create a file called <code class="language-plaintext highlighter-rouge">upd_md.py</code> with the following contents:</p>
<div class="language-python highlighter-rouge"><div class="highlight"><pre class="highlight"><code><span class="kn">import</span> <span class="nn">fileinput</span><span class="p">,</span><span class="n">re</span>
<span class="k">for</span> <span class="n">f</span> <span class="ow">in</span> <span class="n">fileinput</span><span class="o">.</span><span class="nb">input</span><span class="p">(</span><span class="n">inplace</span><span class="o">=</span><span class="bp">True</span><span class="p">):</span>
<span class="k">print</span><span class="p">(</span><span class="n">re</span><span class="o">.</span><span class="n">sub</span><span class="p">(</span><span class="s">r'^(!.*]\()(\w+_files/)'</span><span class="p">,</span> <span class="s">r'\1/images/\2'</span><span class="p">,</span> <span class="n">f</span><span class="p">),</span> <span class="n">end</span><span class="o">=</span><span class="s">''</span><span class="p">)</span>
</code></pre></div></div>
<p>Then, in the terminal, run (assuming that <code class="language-plaintext highlighter-rouge">upd_md.py</code> and your markdown doc are in the same folder):</p>
<div class="language-plaintext highlighter-rouge"><div class="highlight"><pre class="highlight"><code>python upd_md.py name.md
</code></pre></div></div>
<p>This will modify your markdown doc inplace, so it will have the correct <code class="language-plaintext highlighter-rouge">/images/</code> prefix on each image reference.</p>
<p>Finally, copy <code class="language-plaintext highlighter-rouge">name_files</code> to the <code class="language-plaintext highlighter-rouge">images</code> folder in your blog repo, and <code class="language-plaintext highlighter-rouge">name.md</code> to your <code class="language-plaintext highlighter-rouge">_posts</code> folder, and rename <code class="language-plaintext highlighter-rouge">name.md</code> to have the required <code class="language-plaintext highlighter-rouge">YEAR-MONTH-DAY-name.md</code> format. Commit and push this to GitHub, and you should see your post!</p>TonyKhanhWith Notebooks, we can easily share prose, code, tables, charts, and more!Hàm Scan trong Tensorflow2017-08-09T00:00:00+00:002017-08-09T00:00:00+00:00https://tonydeep.github.io/2017/08/09/tensorflow-scan-function<blockquote>
<p>Hàm scan là một một trong những hàm quan trọng trong Theano và giờ đây đã được Tensorflow sử dụng bởi sự tiện lợi và linh hoạt của nó.</p>
</blockquote>
<!--more-->
<ul class="table-of-content" id="markdown-toc">
<li><a href="#overview" id="markdown-toc-overview">Overview</a></li>
<li><a href="#formular" id="markdown-toc-formular">Formular</a></li>
<li><a href="#example-1-hard-code" id="markdown-toc-example-1-hard-code">Example 1: Hard code</a></li>
<li><a href="#example-2-learning-to-predict-the-sum" id="markdown-toc-example-2-learning-to-predict-the-sum">Example 2: Learning to predict the <strong>Sum</strong></a> <ul>
<li><a href="#importing-libs" id="markdown-toc-importing-libs">Importing libs</a></li>
<li><a href="#generating-inputs-and-targets" id="markdown-toc-generating-inputs-and-targets">Generating Inputs and Targets</a></li>
<li><a href="#defining-the-rnn-model-from-scratch" id="markdown-toc-defining-the-rnn-model-from-scratch">Defining the RNN Model from Scratch</a></li>
<li><a href="#defining-an-optimizer" id="markdown-toc-defining-an-optimizer">Defining an Optimizer</a></li>
<li><a href="#training" id="markdown-toc-training">Training</a></li>
<li><a href="#testing-qualitatively" id="markdown-toc-testing-qualitatively">Testing Qualitatively</a></li>
</ul>
</li>
<li><a href="#discussion" id="markdown-toc-discussion">Discussion</a></li>
<li><a href="#conclusion" id="markdown-toc-conclusion">Conclusion</a></li>
</ul>
<h2 id="overview">Overview</h2>
<p>Hàm <strong>Scan</strong> cho phép bạn sử dụng vòng lặp trong <em>Đồ thị tính toán</em> (<a href="https://www.tensorflow.org/versions/r0.10/get_started/basic_usage.html#the-computation-graph">computation graph</a>) của Tensorflow, cho phép bạn sử dụng thuật toán <em>lan truyền ngược</em> (<a href="https://mattmazur.com/2015/03/17/a-step-by-step-backpropagation-example/">backpropagation</a>) và một số kỹ thuật khác trong Machine Learning. Trong Tensorflow bạn có thể định nghĩa k <a href="https://www.tensorflow.org/versions/r0.10/how_tos/graph_viz/index.html#name-scoping-and-nodes">nodes</a> mới cho vòng lặp có <em>k steps</em>. Tuy nhiên giá trị <strong><em>k</em></strong> sẽ cố định thay vì được tuỳ chỉnh mềm dẻo và việc này làm cho đồ thị tính toán của bạn trở nên <a href="https://github.com/tensorflow/tensorflow/issues/511">chậm chạp</a> hơn rất nhiều.</p>
<h2 id="formular">Formular</h2>
<div class="language-python highlighter-rouge"><div class="highlight"><pre class="highlight"><code><span class="n">tf</span><span class="o">.</span><span class="n">scan</span><span class="p">(</span><span class="n">fn</span><span class="p">,</span> <span class="n">elems</span><span class="p">,</span> <span class="n">initializer</span><span class="o">=</span><span class="bp">None</span><span class="p">,</span> <span class="n">parallel_iterations</span><span class="o">=</span><span class="mi">10</span><span class="p">,</span> <span class="n">back_prop</span><span class="o">=</span><span class="bp">True</span><span class="p">,</span> <span class="n">swap_memory</span><span class="o">=</span><span class="bp">False</span><span class="p">,</span> <span class="n">name</span><span class="o">=</span><span class="bp">None</span><span class="p">)</span>
</code></pre></div></div>
<p>Toán tử <em>Scan</em> áp dụng lặp đi lặp lại hàm <code class="language-plaintext highlighter-rouge">fn</code> trên chuỗi các thành phần <code class="language-plaintext highlighter-rouge">elems</code> từ trái sang phải. Các thành phần này được tạo nên từ các <a href="https://www.tensorflow.org/versions/r0.10/get_started/basic_usage.html#tensors">tensor</a> được <a href="https://www.tensorflow.org/versions/r0.10/api_docs/python/array_ops.html#unpack">unpack</a> từ <code class="language-plaintext highlighter-rouge">elems</code> theo chiều (dimension) 0. Hàm khả gọi <code class="language-plaintext highlighter-rouge">fn</code> nhận vào 2 đối số là 2 tensor: Tensor thứ nhất là giá trị tích luỹ được tính từ lời gọi hàm <code class="language-plaintext highlighter-rouge">fn</code> tại bước ngay trước. Nếu <code class="language-plaintext highlighter-rouge">initializer</code> = None, <code class="language-plaintext highlighter-rouge">elems</code> phải chứa ít nhất 1 phần tử và phần tử đầu tiên sẽ được sử dụng như là phần tử khởi tạo <code class="language-plaintext highlighter-rouge">initializer</code>.</p>
<p>Giả sử <code class="language-plaintext highlighter-rouge">elems</code> được giải nén thành tensor <code class="language-plaintext highlighter-rouge">values</code> là list của các tensor, hàm <code class="language-plaintext highlighter-rouge">fn</code> sẽ trả về tensor có định dạng <strong><em>shape</em></strong> = [len(values)] + fn(initializer, values[0]).shape</p>
<h4> Tham số:</h4>
<ul>
<li><em>fn</em>: Hàm áp dụng.</li>
<li><em>elems</em>: Tensor có thể unpack theo <em>chiều</em> (dimension) <strong>0</strong>.</li>
<li><em>initializer</em>: (optional) Giá trị khởi tạo.</li>
<li><em>parallel_iterations</em>: (optional) Số bước lặp cho phép chạy song song.</li>
<li><em>back_prop</em>: (optional) True cho phép <em>back propagation</em>.</li>
<li><em>swap_memory</em>: (optional) True cho phép hoán đổi việc sử dụng GPU-CPU memory.</li>
<li><em>name</em>: (optional) Name prefix for the returned tensors.</li>
</ul>
<h4>Kết quả:</h4>
<p>Một Tensor được nén các kết quả trung gian áp dụng hàm <code class="language-plaintext highlighter-rouge">fn</code> trên list các <code class="language-plaintext highlighter-rouge">tensors</code> giải nén từ <code class="language-plaintext highlighter-rouge">elems</code>, theo thứ tự từ trái sang phải.</p>
<h4>Ví dụ </h4>
<div class="language-python highlighter-rouge"><div class="highlight"><pre class="highlight"><code><span class="n">elems</span> <span class="o">=</span> <span class="p">[</span><span class="mi">1</span><span class="p">,</span> <span class="mi">2</span><span class="p">,</span> <span class="mi">3</span><span class="p">,</span> <span class="mi">4</span><span class="p">,</span> <span class="mi">5</span><span class="p">,</span> <span class="mi">6</span><span class="p">]</span>
<span class="nb">sum</span> <span class="o">=</span> <span class="n">scan</span><span class="p">(</span><span class="k">lambda</span> <span class="n">a</span><span class="p">,</span> <span class="n">x</span><span class="p">:</span> <span class="n">a</span> <span class="o">+</span> <span class="n">x</span><span class="p">,</span> <span class="n">elems</span><span class="p">)</span>
<span class="c1">#=> sum == [1, 3, 6, 10, 15, 21]
</span></code></pre></div></div>
<p>Nào hãy cùng phân tích 2 ví dụ đơn giản để hiểu rõ hơn cách sử dụng <strong>Scan</strong> trong Tensorflow:</p>
<ol>
<li>
<p>Ví dụ 1: Viết một chương trình tính tổng luỹ tích của một list sử dụng <strong>scan</strong>.</p>
<p>Input : [1, 2, 2, 2]</p>
<p>Output: [1, 3, 5, 7]</p>
</li>
<li>
<p>Ví dụ 2: Sử dụng RNN để giải quyết Ví dụ 1 bằng cách train RNN để dự đoán chuỗi output [1, 3, 5, 7] từ chuỗi input đã biết [1, 2, 2, 2].</p>
</li>
</ol>
<h2 id="example-1-hard-code">Example 1: Hard code</h2>
<script src="https://gist.github.com/tonydeep/50e555ed026efb2f518d609d86df5ff7.js"></script>
<div class="language-plaintext highlighter-rouge"><div class="highlight"><pre class="highlight"><code>Output: [ 1. 3. 5. 7.]
</code></pre></div></div>
<p>Ví dụ trên là cách đơn giản để sử dụng <em>Scan</em>. Vậy thực sự <em>Scan</em> làm việc như thế nào trong Tensorflow:
Scan duyệt qua lần lượt từng phần tử trong <code class="language-plaintext highlighter-rouge">elems</code>, tại mỗi vị trí <em>k</em> sẽ áp dụng hàm <code class="language-plaintext highlighter-rouge">fn</code> với <em>inputs</em> là <em>output</em> của bước trước đó <em>k-1</em> và <em>input</em> của bước hiện tại. Giá trị tại bước <em>k = 0</em> được gán khởi tạo trong <code class="language-plaintext highlighter-rouge">initializer</code>:</p>
<ul>
<li>
<p>Lặp 0: fn(0.0, 1.0) == 1.0</p>
</li>
<li>
<p>Lặp 1: fn(1.0, 2.0) == 3.0</p>
</li>
<li>
<p>Lặp 2: fn(3.0, 2.0) == 5.0</p>
</li>
<li>
<p>Lặp 3: fn(5.0, 2.0) == 7.0</p>
</li>
</ul>
<p><strong>Dòng 6</strong>: <code class="language-plaintext highlighter-rouge">elems = tf.identity(elems)</code>: Sử dụng để fix <a href="https://github.com/tensorflow/tensorflow/issues/1725">lỗi ở đây</a>.</p>
<ul>
<li>Không sử dụng hàm <code class="language-plaintext highlighter-rouge">tf.identity()</code>:
<script src="https://gist.github.com/tonydeep/3a08fd63cd778dfc23b21787aa27d86d.js"></script>
Trong ví dụ trên, ta muốn tính cộng thêm 1 và giá trị của biến <code class="language-plaintext highlighter-rouge">x</code> tại <code class="language-plaintext highlighter-rouge">dòng 5</code> sau mỗi lần <code class="language-plaintext highlighter-rouge">y</code> được kiểm tra để in ra ở <code class="language-plaintext highlighter-rouge">dòng 11</code>. Tuy nhiên:</li>
</ul>
<div class="language-plaintext highlighter-rouge"><div class="highlight"><pre class="highlight"><code>Kết quả là: 0.0, 0.0, 0.0, 0.0, 0.0
</code></pre></div></div>
<p>Vấn đề được giải quyết bằng cách sử dụng <code class="language-plaintext highlighter-rouge">tf.identity()</code> như ở code dưới đây:</p>
<ul>
<li>Sử dụng hàm <code class="language-plaintext highlighter-rouge">tf.identity()</code>:
<script src="https://gist.github.com/tonydeep/ecbc055ee3931aa33728c0e3b49c3583.js"></script></li>
</ul>
<div class="language-plaintext highlighter-rouge"><div class="highlight"><pre class="highlight"><code>Kết quả là: 1.0, 2.0, 3.0, 4.0, 5.0
</code></pre></div></div>
<h2 id="example-2-learning-to-predict-the-sum">Example 2: Learning to predict the <strong>Sum</strong></h2>
<p>Ở ví dụ này, chúng ta sẽ viết một chương trình sử dụng mô hình RNN (<a href="https://en.wikipedia.org/wiki/Recurrent_neural_network">Recurrent Neural Network</a>) và huấn luyện (train) mô hình để dự đoán hàm <strong>sum</strong> từ tập dữ liệu huấn luyện (training data).</p>
<h3 id="importing-libs">Importing libs</h3>
<script src="https://gist.github.com/tonydeep/253856a4510727eb6ec04d5536c8f539.js"></script>
<h3 id="generating-inputs-and-targets">Generating Inputs and Targets</h3>
<p>Trước hết chúng ta sẽ sinh <em>training data</em> là các cặp chuỗi <em>input</em> và chuỗi <em>target</em> tương ứng (được dùng như là những vector cột <em>shape</em>=[k, 1])</p>
<script src="https://gist.github.com/tonydeep/bdd13530625ea9ed6e149f45349c890b.js"></script>
<h3 id="defining-the-rnn-model-from-scratch">Defining the RNN Model from Scratch</h3>
<p>Tiếp theo, định nghĩa RNN model. Code tuy có hơi dài nhưng cơ bản với những comment giải thích bên trong sẽ giúp bạn dễ dàng hiểu và thực hành hơn.</p>
<p>Các thành phần chính của RNN như sau:</p>
<ul>
<li>Trạng thái (state) của RNN được update bởi công thức:</li>
</ul>
<script type="math/tex; mode=display">h_{t}=tanh( W_{h}h_{t-1}+W_{x}x_{t}+b)</script>
<ul>
<li><strong><em>_vanilla_rnn_step</em></strong> là thành phần chính của mô hình RNN này: Nó áp dụng công thức trên bằng việc nhận đầu vào là trạng thái của bước trước cùng với input hiện tại và sinh ra trạng thái mới. Có một chút bối rối ở đây khi các bạn phải xử lý <em>shape</em> của các tensor bằng cách chuyển vị (transpose) sao cho phù hợp với việc tính toán và yêu cầu của Tensorflow.</li>
<li><strong><em>_compute_predictions</em></strong> áp dụng <em>_vanilla_rnn_step</em> cho mọi bước sử dụng <strong><em>scan</em></strong>, mỗi bước cho kết quả là một trạng thái mới, sau đó sử dụng một layer để biến shape của trạng thái thành shape của target và dự đoán kết quả.</li>
<li><strong><em>_compute_loss</em></strong> tính khoảng cách Euclid trung bình (<a href="https://en.wikipedia.org/wiki/Euclidean_distance">mean squared Euclidean distance</a>) giữa target thực tế và kết quả dự đoán được.</li>
</ul>
<script src="https://gist.github.com/tonydeep/0e9ed24badf2bbea9959967a489d7e67.js"></script>
<h3 id="defining-an-optimizer">Defining an Optimizer</h3>
<p>Chúng ta tiếp tục định nghĩa lớp Tối ưu hoá (Optimizer). Trong lớp này chúng ta sẽ sử dụng thuật toán gradient descent để update mô hình, sử dụng kỹ thuật <em>cắt ngọn</em> (<a href="https://www.reddit.com/r/MachineLearning/comments/31b6x8/gradient_clipping_rnns/">gradient clipping</a>) để tránh việc <em>bùng nổ</em> gradient (<a href="http://neuralnetworksanddeeplearning.com/chap5.html">exploding gradient</a>), bằng cách sử dụng ngưỡng <em>max_global_norm</em> - Khi đó tại mỗi bước tính toán gradient, mỗi khi global norm (tổng norm của tất cả gradients) vượt quá ngưỡng sẽ được chuẩn hoá thành <em>max_global_norm</em>.
<script src="https://gist.github.com/tonydeep/f0a188ab988243ad18600117e476ca1b.js"></script></p>
<h3 id="training">Training</h3>
<p>Mọi thứ đã sẵn sàng, chúng ta tiến hành định nghĩa và thực thi hàm <em>train</em>, tại đây chúng ta sẽ thực hiện các bước tính toán và update tham số của mô hình, và ghi nhận lại thông tin của của mô hình để có thể quan sát một cách trực quan thông qua công cụ <a href="https://www.tensorflow.org/versions/r0.10/how_tos/graph_viz/index.html#tensorboard-graph-visualization">TensorBoard</a> của Tensorflow.
<script src="https://gist.github.com/tonydeep/c72fb6cd225f93643afb08b2eef09907.js"></script>
Mô hình đươc train như sau:
<script src="https://gist.github.com/tonydeep/e0232059bc01f814433e2c3b1614d591.js"></script>
Sau khi train mô hình, chạy lệnh <code class="language-plaintext highlighter-rouge">tensorboard --logdir ./logdir</code>, vào địa chỉ <code class="language-plaintext highlighter-rouge">http://localhost:6006</code> để quan sát các thông số của mô hình: loss, biểu đồ train mô hình qua từng steps, mô hình trực quan, …</p>
<!--  -->
<p><img src="/assets/images/scan_post/loss_raw.png" alt="" style="width:200px; height:200px;" /></p>
<!--  -->
<p><img src="/assets/images/scan_post/loss_ema.png" alt="" style="width:200px; height:200px;" /></p>
<h3 id="testing-qualitatively">Testing Qualitatively</h3>
<p>Cuối cùng chúng ta tiến hành kiểm tra chất lượng của mô hình bằng cách vẽ chuỗi target và chuỗi dự đoán trên cùng một biểu đồ, nếu 2 chuỗi có xu hướng chồng lên nhau thì mô hình cơ bản là tốt, ngược lại nếu 2 chuỗi tách biệt nhau thì mô hình dự đoán yếu.
<script src="https://gist.github.com/tonydeep/0d61bf5619d3b758234f526609f43031.js"></script></p>
<p>và chạy:</p>
<div class="language-python highlighter-rouge"><div class="highlight"><pre class="highlight"><code><span class="n">test_qualitatively</span><span class="p">(</span><span class="n">sess</span><span class="p">,</span> <span class="n">model</span><span class="p">,</span> <span class="n">generator</span><span class="p">,</span> <span class="n">figsize</span><span class="o">=</span><span class="p">(</span><span class="mi">8</span><span class="p">,</span> <span class="mi">2</span><span class="p">))</span>
</code></pre></div></div>
<p>Kết quả như sau:</p>
<!--  -->
<p><img src="/assets/images/scan_post/predictions.png" alt="" style="width:500px; height:700px;" /></p>
<h2 id="discussion">Discussion</h2>
<p>Vậy là các bạn đã hoàn thiện một chương trình RNN đơn giản để huấn luyện mô hình dự đoán chuỗi tổng luỹ tích từ chuỗi input cho trước. Một số phần các bạn có thể lưu ý để cải thiện mô hình tốt hơn:</p>
<ul>
<li>Giá trị của <code class="language-plaintext highlighter-rouge">hidden_layer_size</code>, trong mô hình trên chúng ta gán <code class="language-plaintext highlighter-rouge">hidden_layer_size = 256</code>. Các bạn hãy thử với các giá trị nhỏ hơn (mỗi lần chia cho 2) và quan sát <code class="language-plaintext highlighter-rouge">loss</code>.</li>
<li>Giá trị của <code class="language-plaintext highlighter-rouge">initial_learning_rate=1e-2</code>. Hãy thử với các giá trị khác và quan sát <code class="language-plaintext highlighter-rouge">loss</code>.</li>
<li>Giá trị cho <em>gradient clipping</em> <code class="language-plaintext highlighter-rouge">max_global_norm=1.0</code>. Hãy thử train mô hình mà không sử dụng <em>gradient clipping</em>, cùng đó kết hợp với lựa chọn <code class="language-plaintext highlighter-rouge">initial_learning_rate</code> phù hợp.</li>
</ul>
<h2 id="conclusion">Conclusion</h2>
<ul>
<li>Mô hình trên được huấn luyện tại mỗi bước cho sử dụng duy nhất 1 cặp chuỗi input và target. Việc này làm tăng thời gian huấn luyện mô hình. Cải thiện bằng cách có thể sử dụng input_size lên tuỳ thuộc vào cấu hình máy.</li>
<li>Mô hình trên sử dụng chỉ một layer, chúng ta có thể mở rộng thành <em>deep model</em> bằng cách chồng thêm 1, 2, … các layer lên nhau: Thực hiện hàm <strong>scan</strong> để lấy kết quả layer thứ nhất, chạy <strong>scan</strong> lần thứ hai để lấy kết quả của layer thứ 2, cứ tiếp tục như vậy. Lưu ý: Output của layer <em>l</em> sẽ là input của layer <em>l+1</em>.</li>
<li>Mô hình RNN cơ bản này ít khi sử dụng gần đây do hai vấn đề của nó là triệt tiêu và bùng nổ gradient (<a href=”“https://en.wikipedia.org/wiki/Vanishing_gradient_problem><em>vanishing và expoding gradient</em></a>). Hai mô hình thay thế cho RNN hay được sử dụng là LSTM (<a href="http://colah.github.io/posts/2015-08-Understanding-LSTMs/">Long-Short Term Memory</a>) và GRU (<a href="http://www.wildml.com/2015/10/recurrent-neural-network-tutorial-part-4-implementing-a-grulstm-rnn-with-python-and-theano/">Gated Recurrent Unit</a>).</li>
<li>Chúng ta đang sử dụng thuật toán BPTT (<a href="https://en.wikipedia.org/wiki/Backpropagation_through_time">backpropagation through time</a>) đầy đủ bằng cách thực hiện toàn bộ quá trình lan truyền xuôi, ngược cho mỗi lượt update gradietn. Việc này làm cho quá trình train mô hình của chúng ta trở nên chậm, tốn thời gian. Một kỹ thuật thay thế là sử dụng <a href="http://www.wildml.com/2015/10/recurrent-neural-networks-tutorial-part-3-backpropagation-through-time-and-vanishing-gradients/">truncated backpropagation through time</a> bằng cách cập nhật thông tin của mô hình thông qua một khoảng thời gian gần hơn trong quá khứ tuy vậy vẫn đảm bảo giữ được thông tin xa hơn quá khứ vì chúng cũng được lưu lại trong các trạng thái.</li>
</ul>TonyKhanhHàm scan là một một trong những hàm quan trọng trong Theano và giờ đây đã được Tensorflow sử dụng bởi sự tiện lợi và linh hoạt của nó.Cross-Entropy Loss là gì?2017-07-07T00:00:00+00:002017-07-07T00:00:00+00:00https://tonydeep.github.io/tensorflow/2017/07/07/Cross-Entropy-Loss<blockquote>
<p>This post reviews some extremely remarkable results in applying deep neural networks to natural language processing (NLP)</p>
</blockquote>
<!--more-->
<h2 id="contents">Contents</h2>
<ul class="table-of-content" id="markdown-toc">
<li><a href="#contents" id="markdown-toc-contents">Contents</a></li>
<li><a href="#introduction" id="markdown-toc-introduction">Introduction</a></li>
<li><a href="#entropy" id="markdown-toc-entropy">Entropy</a> <ul>
<li><a href="#code-codeword-encode-decode" id="markdown-toc-code-codeword-encode-decode">Code, Codeword, Encode-Decode</a></li>
<li><a href="#không-gian-codeword" id="markdown-toc-không-gian-codeword">Không gian codeword</a></li>
<li><a href="#optimal-encoding---mã-tối-ưu" id="markdown-toc-optimal-encoding---mã-tối-ưu">Optimal Encoding - Mã tối ưu</a></li>
<li><a href="#công-thức-tính-entropy" id="markdown-toc-công-thức-tính-entropy">Công thức tính Entropy</a></li>
</ul>
</li>
<li><a href="#cross-entropy" id="markdown-toc-cross-entropy">Cross Entropy</a> <ul>
<li><a href="#tại-sao-cross-entropy-lại-quan-trọng-" id="markdown-toc-tại-sao-cross-entropy-lại-quan-trọng-">Tại sao cross-entropy lại quan trọng ???</a></li>
</ul>
</li>
<li><a href="#kl-divergence---kl-phân-kỳ" id="markdown-toc-kl-divergence---kl-phân-kỳ">KL Divergence - KL phân kỳ</a></li>
<li><a href="#khả-năng-dự-đoán" id="markdown-toc-khả-năng-dự-đoán">Khả năng dự đoán</a></li>
<li><a href="#likelihood" id="markdown-toc-likelihood">Likelihood</a></li>
<li><a href="#thảo-luận" id="markdown-toc-thảo-luận">Thảo luận</a></li>
<li><a href="#nguồn-tham-khảo" id="markdown-toc-nguồn-tham-khảo">Nguồn tham khảo</a></li>
</ul>
<h2 id="introduction">Introduction</h2>
<div class="imgcap" style="align-content:center;">
<img src="/assets/images/ce_post/shanon-entropy.jpeg" alt="" style="width:350px; height:250px;" />
<div class="thecap" style="font-size: 15px;">Giai thoại Neumann-Shannon (From <a href="http://www.eoht.info/page/Neumann-Shannon+anecdote">Hmopedia</a>)</div>
</div>
<div class="spaceafterimg"></div>
<p>Mục tiêu của bài toán phân lớp dựa trên tính toán xác suất (<a href="https://en.wikipedia.org/wiki/Probabilistic_classification"><em>Probabilistic classification</em></a>) là gán (<em>map</em>) dữ liệu đầu vào cho nhãn của lớp có xác suất cao nhất, và chúng ta thường <em>train</em> mô hình bằng điều chỉnh tham số của mô hình sao cho xác suất dự đoán được càng sát với <em>ground-truth probabilities</em> càng tốt.</p>
<p>Chúng ta giả sử chỉ xét mô hình với nhãn các lớp là phân biệt. Ví dụ cho bài toán phân lớp ảnh số từ <script type="math/tex">0-9</script> <a href="https://en.wikipedia.org/wiki/MNIST_database">MNIST database</a> với <em>input</em> là danh sách các ảnh và <em>output</em> là <script type="math/tex">10</script> số từ <script type="math/tex">0-9</script>, mô hình sẽ dự đoán xác suất output (cho mỗi ảnh input tương ứng) là danh sách <script type="math/tex">10</script> số mỗi số là xác suất mà ảnh đầu vào sẽ thuộc lớp tương ứng, và thoả mãn: <script type="math/tex">\sum_{k=0}^9\hat{y}_k = 1.0</script></p>
<p>Trong quá trình <em>training</em>, giả sử chúng ta có ảnh input là ảnh mang số <script type="math/tex">9</script> và mô hình được kỳ vọng sẽ dự đoán xác suất đầu ra gần với <em>ground-truth class probability</em> <script type="math/tex">y = (0.0, 0.0, 0.0, 0.0, 0.0, 0.0, 0.0, 0.0, 0.0, 1.0)^T</script>, nghĩa là xác suất tại vị trí số <script type="math/tex">9</script> của output <script type="math/tex">y</script> đạt <script type="math/tex">max</script>. Giả sử mô hình dự đoán phân bố xác suất output khác biệt so với target <script type="math/tex">y</script>, với <script type="math/tex">\hat{y} = (0.0, 0.0, 0.0, 0.0, 0.0, 0.1, 0.1, 0.4, 0.3, 0.1)</script>, thì chúng ta sẽ phải <em>điều chỉnh</em> tham số của mô hình sao cho <script type="math/tex">\hat{y}</script> <strong><em>tiến gần tới</em></strong> <script type="math/tex">y</script>.</p>
<p>Vậy thế nào là <em>điều chỉnh</em> tham số cho <script type="math/tex">\hat{y}</script> <strong><em>tiến gần tới</em></strong> <script type="math/tex">y</script>. Ở đây nghĩa là chúng ta sẽ tìm cách <strong><em>đánh giá sự khác biệt</em></strong> giữa <script type="math/tex">\hat{y}</script> và <script type="math/tex">y</script>.</p>
<p>Có nhiều cách để đánh giá sự khác biệt này, ở post này chúng ta sẽ đi tìm hiểu một trong số những cách phổ biến nhất đó chính là <strong><em>cross-entropy</em></strong>, và đánh giá tại sao cross-entropy lại phù hợp cho bài toán phân lớp (classification).</p>
<p><a id="entropy"></a></p>
<h2 id="entropy">Entropy</h2>
<div class="imgcap">
<img src="/assets/images/ce_post/without_claude_shannon_there_would_be_no_internet_wide_image.jpg" alt="" style="width:550px; height:200px;" />
<div class="thecap" style="font-size: 15px;"><a href="https://en.wikipedia.org/wiki/Claude_Shannon">Claude Shannon</a></div>
</div>
<div class="spaceafterimg"></div>
<h3 id="code-codeword-encode-decode">Code, Codeword, Encode-Decode</h3>
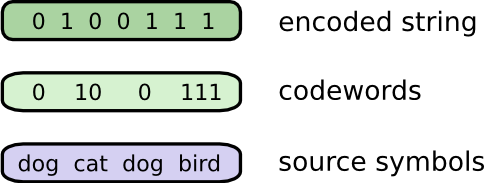
<p>Các bạn hẳn vẫn còn nhớ cô nàng Alice và anh chàng Bob trong những câu chuyện về an toàn bảo mật thông tin. Lần này câu chuyện của 2 bạn ấy như sau: Bob rất thích động vật, anh ấy có thể nói chuyện cả ngày với Alice về chủ đề động vật. Đặc biệt khi nói chuyện với Alice anh ấy luôn chỉ có nói 4 từ: “<em>dog</em>”, “<em>cat</em>”, “<em>fish</em>” và “<em>bird</em>”.</p>
<p>Một lần Bob đi du lịch xa, Bob liên lạc với Alice qua tin nhắn và mã hoá tin nhắn chỉ gồm các ký tự nhị phân <script type="math/tex">0</script> và <script type="math/tex">1</script>. Tin nhắn của Bob như sau:</p>
<!--  -->
<p><img src="/assets/images/ce_post/binary_bits.png" alt="" style="width:140px; height:40px;" /></p>
<p>Để thuận tiện cho việc trao đổi, Bob và Alice cùng thống nhất với nhau về cách thức mã hoá tin nhắn bằng cách thay thế từng từ thành chuỗi nhị phân (<em>codeword</em>) độ dài 2 bit tương ứng và ghép lại thành 1 chuỗi tin nhắn duy nhất. Cụ thể:</p>
<!-- 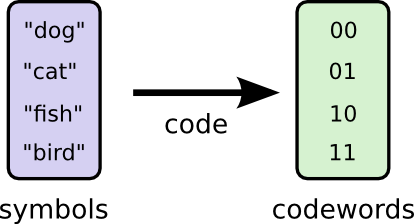 -->
<p><img src="/assets/images/ce_post/code-2bit.png" alt="" style="width:300px; height:210px;" /></p>
<p>và giải mã thông tin như sau:</p>
<!-- 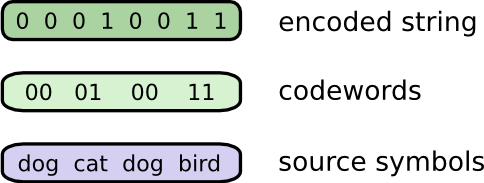 -->
<p><img src="/assets/images/ce_post/encode-2bit.png" alt="" style="width:350px; height:160px;" /></p>
<p>Mọi chuyện sẽ không đáng lo nếu như giá cước là <script type="math/tex">100</script> đồng/<em>1 bit</em>, nhưng nay đã tăng lên là <script type="math/tex">500</script> đồng/<em>1 bit</em>. Giá cả đắt đỏ chẳng nhẽ lại thôi không liên lạc nữa. Do vậy, Bob và Alice quyết tìm ra cách nào đó để tin nhắn ngắn hơn (để giảm cước phí) nhưng vẫn đảm bảo chuyển tải được đầy đủ thông tin.</p>
<p>Cùng nhau xem xét lại lịch sử các tin nhắn, Alice thấy rằng Bob tần suất các từ trong tin nhắn của Bob không tương đương với nhau. Cụ thể là: Bob thực sự thích “<em>dog</em>”, anh ấy chủ yếu nói về “<em>dog</em>” trong mọi tin nhắn của mình, thỉnh thoảng Bob mới nhắc đến 3 con vật còn lại là “<em>cat</em>”, “<em>fish</em>” và “<em>bird</em>”. Tần suất cụ thể như bảng thống kê dưới đây:</p>
<!-- 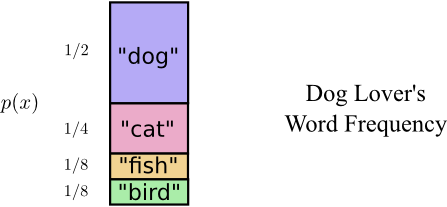 -->
<p><img src="/assets/images/ce_post/DogWordFreq.png" alt="" style="width:350px; height:160px;" /></p>
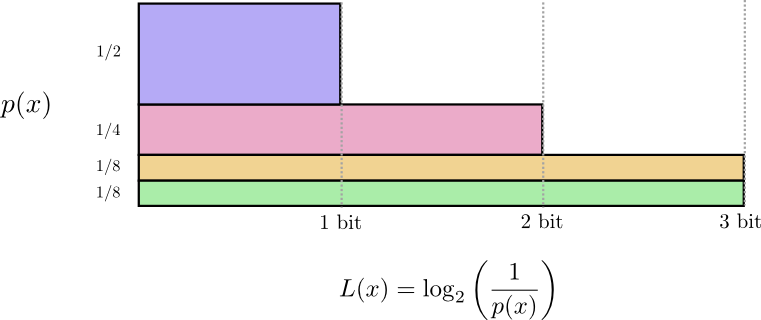
<p>Phân tích một cách chi tiết hơn về <em>codeword</em> mà 2 bạn đã dùng bằng biểu đồ dưới đây, với: <em>Trục tung</em> - Thể hiện xác suất xuất hiện <script type="math/tex">p(x)</script> của 1 word; <em>Trục hoành</em> - Độ dài <script type="math/tex">L(x)</script> của codeword tương ứng; <em>Diện tích</em> - <em>Expected codeword lenght</em>: Độ dài kỳ vọng hay độ dài trung bình của một codeword được gửi đi, ở đây = <em>2 bit</em>:</p>
<!-- 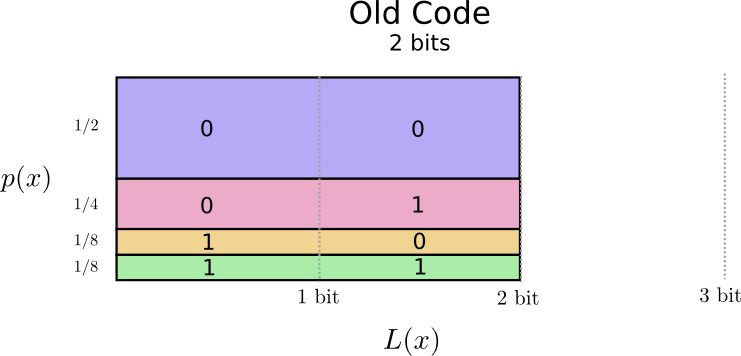 -->
<p><img src="/assets/images/ce_post/OldCode.png" alt="" style="width:550px; height:310px;" /></p>
<p>Như vậy, mục tiêu của 2 bạn là <em>cực tiểu</em> độ dài của tin nhắn gửi đi. Ở đây là hoàn toàn có thể lựa chọn codeword có <a href="https://en.wikipedia.org/wiki/Variable-length_code">độ dài khác nhau</a>. Theo thuật toán tham lam thì word nào xuất hiện nhiều (<em>word phổ biến</em>, ví dụ như “<em>dog</em>”) sẽ ưu tiên chọn độ dài codeword tương ứng ngắn hơn và ngược lại những word nào xuất hiện ít (<em>word hiếm</em>, ví dụ như “<em>bird</em>”) thì codeword sử dụng sẽ dài hơn. Cụ thể ta có được như sau:</p>
<!-- 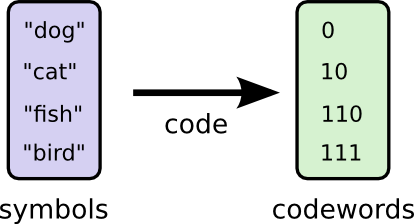 -->
<p><img src="/assets/images/ce_post/code.png" alt="" style="width:350px; height:180px;" /></p>
<p>Biểu đồ phân tích cho bộ codeword mới như sau:</p>
<!-- 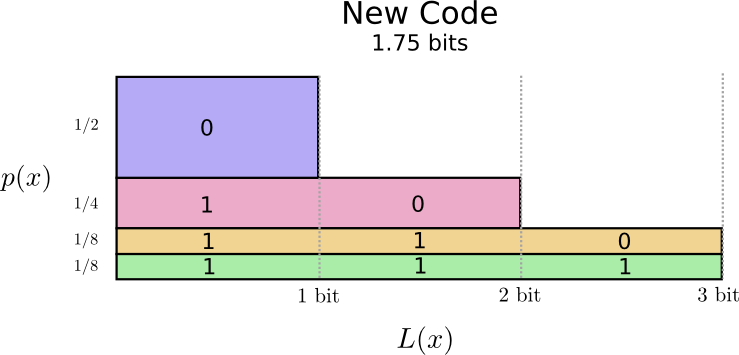 -->
<p><img src="/assets/images/ce_post/NewCode.png" alt="" style="width:550px; height:310px;" /></p>
<p>Để ý rằng trong biểu đồ trên độ dài của codeword phổ biến ngắn hơn trong khi đó độ dài của codeword hiếm là dài hơn. Phần diện tích được tính toán cũng nhỏ hơn,và tương ứng với độ dài trung bình của codeword là <script type="math/tex">1.75</script>. Như vậy bằng cách sử dụng codeword có độ dài khác nhau ta có thể làm cho độ dài trung bình của codeword nhỏ hơn.</p>
<p>Bạn cũng có thể tự hỏi rằng tại sao ko dùng tất cả codeword độ dài bằng 1 cả. Với cách này thì bạn sẽ gặp phải vấn đề nhập nhằng (<em>ambiguity</em>) trong quá trình giải mã (<em>decode</em>)(sẽ giải thích cụ thể hơn ở phần tiếp).</p>
<p>Với ví dụ trên cùng với phân bố xác suất <script type="math/tex">p(x) = (\frac{1}{2}, \frac{1}{4}, \frac{1}{8}, \frac{1}{8})</script>, thì <script type="math/tex">1.75</script> là giá trị tối ưu, nghĩa là chúng ta sẽ không tìm được bộ codeword nào phù hợp mà có giá trị trung bình nhỏ hơn <script type="math/tex">1.75</script>.</p>
<p>Như vậy, các bạn có thể thấy rằng với mỗi bộ phân bố xác suất <script type="math/tex">p(X)</script> cho trước, ta hoàn toàn xác định được giá trị tối ưu của code, hay độ dài trung bình tối ưu của codeword. Và giá trị này được gọi là <a href="https://en.wikipedia.org/wiki/Entropy_information_theory">Entropy</a>.</p>
<!-- 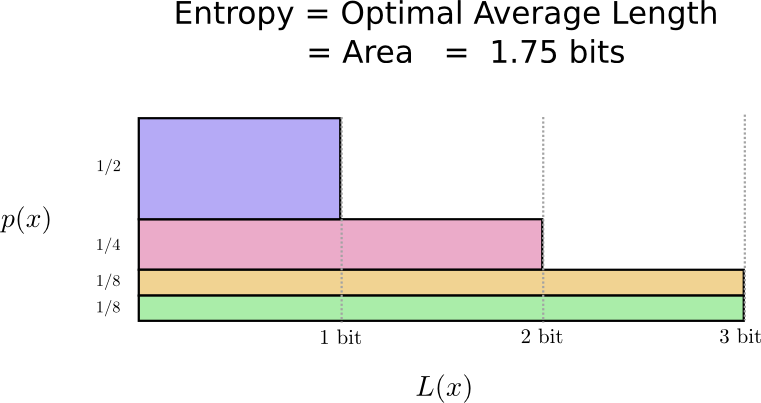 -->
<p><img src="/assets/images/ce_post/EntropOptimalLengthExample.png" alt="" style="width:550px; height:310px;" /></p>
<h3 id="không-gian-codeword">Không gian codeword</h3>
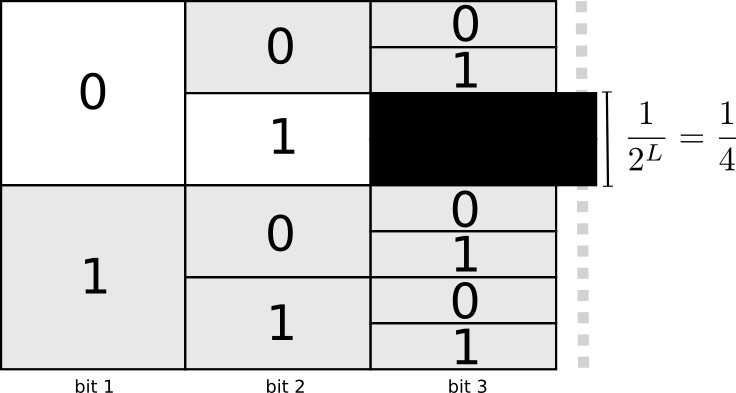
<p>Chúng ta có 2 codeword độ dài 1 là: <em>0</em> và <em>1</em>; 4 codeword độ dài 2 là: <em>00</em>, <em>01</em>, <em>10</em>, <em>11</em>; và tổng quát là <script type="math/tex">2^n</script> codeword độ dài n.</p>
<!-- 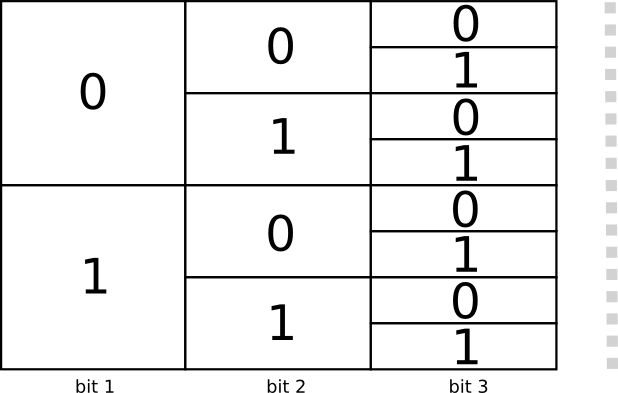 -->
<p><img src="/assets/images/ce_post/CodeSpace.png" alt="" style="width:400px; height:200px;" /></p>
<p>Như trên đã nói, bạn hoàn toàn có thể tuỳ ý lựa chọn codeword có độ dài bất kỳ. Ví dụ như hình trên là 8 codeword độ dài 3, bạn có thể lựa chọn một cách tổ hợp các codeword có độ dài khác nhau như bạn chọn 2 codeword độ dài 2, 4 codeword độ dài 3 chẳng hạn.</p>
<p>Vậy điều gì quyết định đến việc chọn lựa codeword với độ dài khác nhau.</p>
<p>Ở hình dưới, Bob mã hoá tin nhắn bằng cách thay thế từng word bằng codeword tương ứng và ghép lại thành một chuỗi mã hoá nhị phân.</p>
<!--  -->
<p><img src="/assets/images/ce_post/encode.png" alt="" style="width:350px; height:150px;" /></p>
<p>Có một điều bạn cần lưu ý ở đây là làm thế nào để từ chuỗi mã hoá bạn có thể giải mã ngược lại thành chuỗi các codeword. Nếu như chọn codeword có độ dài như nhau thì việc này khá đơn giản. Tuy nhiên bạn lựa chọn codeword độ dài khác nhau việc giải mã ngược lại được thành chuỗi codeword là việc hết sức quan trọng.</p>
<p>Thực tế, bạn cần chọn bộ codeword sao cho việc giải mã là duy nhất. Bằng không bạn sẽ rơi vào tình trạng “<em>nhập nhằng</em>”, nghĩa là từ một chuỗi mã hoá sẽ có nhiều chuỗi giải mã thoả mãn. Ví dụ, nếu bạn chọn cả <script type="math/tex">0</script> và <script type="math/tex">01</script> trong bộ codeword của bạn, thì với chuỗi mã hoá <script type="math/tex">01101</script> bạn sẽ khó quyết định đâu là codeword phù hợp được dùng để giải mã cho 2 bit đầu. Do đó, bạn sẽ không chọn bộ codeword là <em>prefix code</em> - nghĩa là không codeword nào là <em>prefix</em> của codeword trong cùng một bộ.</p>
<p>Để dễ dàng cho việc lựa chọn <em>prefix code</em>, bạn sẽ sử dụng một phương pháp gọi là “<em>hi sinh</em>”, nghĩa là khi bạn đã chọn một codeword, ví dụ như <script type="math/tex">01</script>, thì toàn bộ không gian codeword bắt đầu bằng <script type="math/tex">01</script> sẽ không được sử dụng, ví dụ bạn sẽ không được dùng các codeword như: <script type="math/tex">010</script>, <script type="math/tex">0101</script>, … bởi nó sẽ gây ra tình trạng “<em>nhập nhằng</em>” cho quá trình giải mã.</p>
<!--  -->
<p><img src="/assets/images/ce_post/CodeSpaceUsed.png" alt="" style="width:550px; height:300px;" /></p>
<p>Với <script type="math/tex">\frac{1}{4}</script> trong tổng số codeword bắt đầu bằng <script type="math/tex">01</script>, như vậy nếu codeword <script type="math/tex">01</script> được chọn, bạn sẽ phải “<em>hi sinh</em>” <script type="math/tex">\frac{1}{4}</script> tổng số codeword. Đây là “<em>chi phí</em>” bạn phải trả để có được một codeword độ dài 2.</p>
<h3 id="optimal-encoding---mã-tối-ưu">Optimal Encoding - Mã tối ưu</h3>
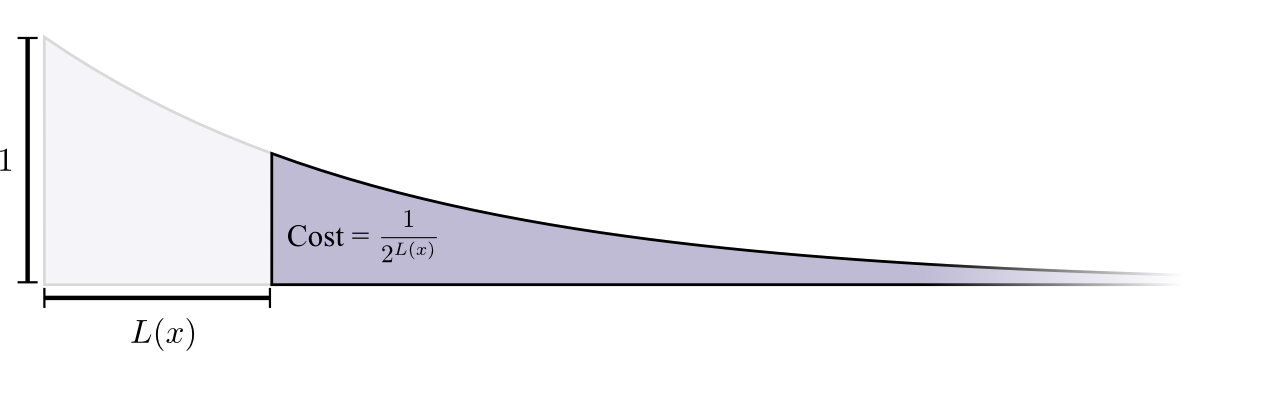
<p>Ở đây, bạn coi việc này giống như bạn đang có một <em>ngân khố</em> đầy đủ với tỷ lệ <script type="math/tex">\frac{1}{1}</script>, mỗi khi bạn chọn một codeword độ dài L thì theo thuyết “<em>hi sinh</em>” ở trên bạn phải “<em>hi sinh</em>” một “<em>chi phí</em>” với tỷ lệ codeword là <script type="math/tex">\frac{1}{2^L}</script>.</p>
<p><em>Chi phí</em> cho codeword có độ dài <script type="math/tex">0</script> là <script type="math/tex">1</script> - tức toàn bộ codeword - nghĩa là nếu bạn chọn codeword có độ dài 0 thì bạn sẽ không được chọn bất kỳ codeword nào khác nữa; <em>Chi phí</em> cho codeword độ dài 1, ví dụ như codeword <script type="math/tex">0</script>, là <script type="math/tex">\frac{1}{2}</script> vì có <script type="math/tex">\frac{1}{2}</script> số lượng codeword bắt đầu bằng <script type="math/tex">0</script>; <em>Chi phí</em> cho codeword độ dài 2, ví dụ “<script type="math/tex">10</script>”, là <script type="math/tex">\frac{1}{4}</script> vì có <script type="math/tex">\frac{1}{4}</script> số lượng codewprd bắt đầu bằng “10”. Tổng quát, <em>Chi phí</em> cho codeword giảm theo hàm luỹ mũ của độ dài codeword.</p>
<!--  -->
<p><img src="/assets/images/ce_post/code-costonly.png" alt="" style="width:700px; height:250px;" /></p>
<h3 id="công-thức-tính-entropy">Công thức tính Entropy</h3>
<p><em>Chi phí</em> cho codeword độ dài L là <script type="math/tex">cost = \frac{1}{2^L}</script>, hay ngược lại nếu ta biết <script type="math/tex">cost</script> của 1 codeword thì ta có thể tính được độ dài của codeword như sau: <script type="math/tex">l = \log_{2}(\frac{1}{cost})</script>. Nếu bạn “<em>tiêu</em>” một chi phí <script type="math/tex">p(x)</script> cho codeword <script type="math/tex">x</script>, độ dài của codeword x sẽ là <script type="math/tex">\log_{2}(\frac{1}{p(x)})</script>.</p>
<!--  -->
<p><img src="/assets/images/ce_post/entropy-def-notitle.png" alt="" style="width:550px; height:300px;" /></p>
<p>Với một phân bố xác suất cụ thể <script type="math/tex">p</script>, ta xác định được độ dài trung bình ngắn nhất của bộ codeword - được gọi là “<em>entropy</em>” của <script type="math/tex">p</script>, kí hiệu là <script type="math/tex">H(p)</script>. Ta có:</p>
<script type="math/tex; mode=display">\begin{equation}
H(p) = \sum_{x} p(x) \log_{2}(\frac{1}{p(x)}) = -\sum_{x} p(x) \log_{2}(p(x))
\end{equation}</script>
<p>Nói một cách khác, nếu x là một sự kiện ngẫu nhiên rời rạc (có thể nhận các giá trị là 1..n), <script type="math/tex">p(x)</script> là xác suất xảy ra của giá trị x, thì Entropy chính là giá trị kỳ vọng <em>số bits</em> được mã hoá tối ưu. Như vậy, trung bình mỗi khi cần nhắn tin, Bob và Alice cần sử dụng ít nhất <script type="math/tex">H(p)</script> bit.</p>
<p>Entropy mô tả độ “<strong><em>không chắc chắn</em></strong>” của thông tin và là một cách để bạn định lượng được thông tin này. Giả sử nếu bạn biết chắc chắn có 2 sự kiện xảy ra với xác suất 50/50, bạn chắc chắn chỉ cần dùng 1 bit để nhắn tin. Hoặc nếu bạn biết có 16 sự kiện xảy ra với xác suất như nhau và <script type="math/tex">= \frac{1}{16}</script> thì bạn chắc chắn chỉ cần 4 bit để nhắn tin.</p>
<p><a id="minimizing-cross-entropy"></a></p>
<h2 id="cross-entropy">Cross Entropy</h2>
<!--  -->
<p><img src="/assets/images/ce_post/tools.jpg" alt="" style="width:350px; height:250px;" /></p>
<p>Trở lại với câu chuyện của Bob và Alice, lúc trước 2 bạn chỉ nói tới sự quan tâm của Bob về 4 loại động vật: <script type="math/tex">dog</script>, <script type="math/tex">cat</script>, <script type="math/tex">fish</script> và <script type="math/tex">bird</script>, đặc biệt sở thích của Bob về <script type="math/tex">dog</script>. Có chút thay đổi trong hoàn cảnh này là với Alice, cô cũng thích cả 4 loại động vật trên như Bob, nhưng cô thích nói về <script type="math/tex">cat</script> hơn cả. Như vậy, 2 người có cùng “<script type="math/tex">vocabulary size</script>” nhưng khác nhau về tần suất cho từng loại. Bob có thể nói cả ngày về chủ đề <script type="math/tex">dog</script>, trong khi đó Alice lại cũng có thể nói cả ngày với chủ đề <script type="math/tex">cat</script>.</p>
<p>Cụ thể như hình dưới đây:</p>
<!-- 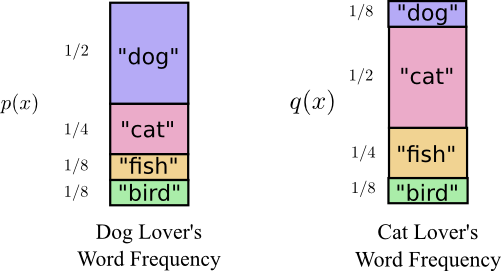 -->
<p><img src="/assets/images/ce_post/DogCatWordFreq.png" alt="" style="width:450px; height:250px;" /></p>
<p>Ban đầu, Alice gửi tin cho Bob cùng sử dụng bộ code của Bob. Tuy nhiên tin nhắn của Alice lại có vẻ dài hơn so với mong đợi của 2 bạn. Bộ code của Bob đã được tối ưu dựa trên phân bố xác suất của Bob. Alice đã sử dụng bộ code được tối ưu (<strong><em>suboptimal</em></strong>) dựa trên phân bố xác suất của riêng mình. Do đó trong khi độ dài trung bình codeword của Bob là sử dụng bộ code của Bob là <script type="math/tex">1.75</script> bit, thì độ dài trung bình codeword của Alice sử dụng bộ code của Bob lại dài hơn là <script type="math/tex">2.25</script> bit.</p>
<p>Vậy làm sao để đánh giá 2 codeword này??</p>
<p><a href="https://en.wikipedia.org/wiki/Cross_entropy">Cross-Entropy</a> là độ đo đánh giá độ dài trung bình số lượng bit cần thiết để mã hoá thông điệp với phân bố xác suất là <script type="math/tex">q(x)</script>, sử dụng bộ codeword tối ưu (có phân bố xác suất là <script type="math/tex">p(x)</script>).</p>
<p>Nếu bạn nghĩ phân bố xác suất là một <strong><em>tool</em></strong> để mã hoá thông tin, thì <strong>entropy</strong> là độ đo để đánh giá số lượng bit bạn cần để sử dụng <strong><em>tool chuẩn</em></strong> <script type="math/tex">p(x)</script> - đây là tool đã được tối ưu vì bạn không thể mã hoá sử dụng số bit trung bình ít hơn.</p>
<p>Ngược lại, <strong>cross-entropy</strong> là số lượng bit bạn cần để nếu bạn mã hoá thông tin của <strong><em>tool chuẩn</em></strong> <script type="math/tex">p(x)</script> sử dụng <strong><em>tool sai</em></strong> <script type="math/tex">q(x)</script>. Nghĩa là khi mã hoá thông điệp cho sự kiện <script type="math/tex">i^{th}</script> thay vì sử dụng <script type="math/tex">\log_{2} \frac{1}{p(x_{i})}</script> bit bạn lại dùng <script type="math/tex">log_{2} \frac{1}{q(x_{i})}</script> bit.</p>
<p>Ta có:
<script type="math/tex">H(p, q) = H_{q}(p) = \sum_{x} p(x) \log(\frac{1}{q(x)}) = - \sum_{x} p(x) \log(q(x))</script></p>
<p>Ví dụ ta có:</p>
<!-- 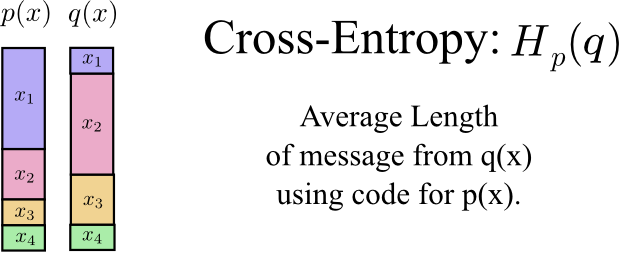 -->
<p><img src="/assets/images/ce_post/CrossEntropyDef.png" alt="" style="width:500px; height:200px;" /></p>
<ul>
<li>Cross-entroy luôn luôn lớn hơn Entropy; Việc mã hoá sử dụng <em>tool sai</em> <script type="math/tex">q(x)</script> sẽ luôn phải sử dụng nhiều bit hơn.</li>
<li>Cross-entropy không có tính chất đối xứng, nghĩa là <script type="math/tex">H(p, q) \neq H(q, p)</script>.</li>
</ul>
<p>Ta có thể có một vài kịch bản sau:</p>
<ul>
<li>Bob sử dụng Bob code: <script type="math/tex">H(p) = H_{p}(p) = 1.75</script> bit</li>
<li>Alice sử dụng Bob code: <script type="math/tex">H_{p}(q) = 2.25</script> bit</li>
<li>Alice sử dụng Alice code: <script type="math/tex">H(p) = H_{q}(q) = 1.75</script> bit</li>
<li>Bod sử dụng Alice code: <script type="math/tex">H_{q}(p) = 2.375</script> bit</li>
</ul>
<!-- 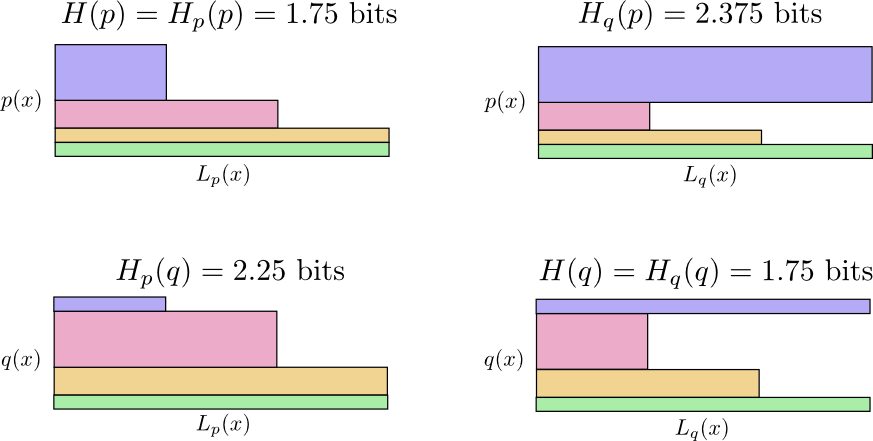 -->
<p><img src="/assets/images/ce_post/CrossEntropyCompare.png" alt="" style="width:800px; height:400px;" /></p>
<h3 id="tại-sao-cross-entropy-lại-quan-trọng-">Tại sao cross-entropy lại quan trọng ???</h3>
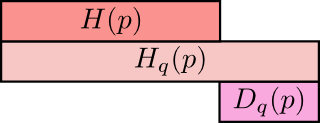
<p>Cross-entropy cho biết sự mức độ khác biệt giữa 2 phân bố xác suất. Sự khác biệt giữa phân bố <script type="math/tex">p</script> và <script type="math/tex">q</script> càng lớn, thì cross-entropy của p đối với q sẽ càng lớn hơn entropy của p.</p>
<!-- 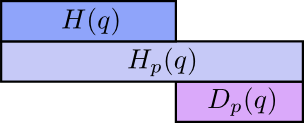 -->
<p><img src="/assets/images/ce_post/CrossEntropyPQ.png" alt="" style="width:250px; height:100px;" /></p>
<p>Tương tự, sự khác biệt giữa phân bố <script type="math/tex">p</script> và <script type="math/tex">q</script> càng lớn, thì cross-entropy của q đối với p sẽ càng lớn hơn entropy của q.</p>
<!--  -->
<p><img src="/assets/images/ce_post/CrossEntropyQP.png" alt="" style="width:250px; height:100px;" /></p>
<p><a id="kl-divergence"></a></p>
<h2 id="kl-divergence---kl-phân-kỳ">KL Divergence - KL phân kỳ</h2>
<!--  -->
<p><img src="/assets/images/ce_post/KL-Gauss-Example.png" alt="" style="width:550px; height:450px;" /></p>
<p>Điều thực sự thú vị ở đây chính là sự khác biệt giữa entropy và cross-entropy. Có thể nói nó là sự khác biệt hay <em>khoảng cách</em> giữa 2 phân bố xác suất <script type="math/tex">p(x)</script> và <script type="math/tex">q(x)</script>. Nếu 2 phân bố xác suất này giống nhau thì khoảng cách là <script type="math/tex">0</script> và ngược lại sự khác biệt càng lớn thì giá trị này càng lớn.</p>
<p>Và nó được gọi là <a href="https://en.wikipedia.org/wiki/Kullback%E2%80%93Leibler_divergence">KL divergence</a>:</p>
<p>\begin{equation}
D( p | q) = \sum_x p_x \log \frac{1}{q_x} - \sum_x p_x \log \frac{1}{p_x}
= \sum_x p_x \log \frac{p_x}{q_x}
= H(P, Q) - H(P)
\end{equation}</p>
<p>với <script type="math/tex">H(P, Q)</script> là cross-entropy; <script type="math/tex">H(P)</script> là entropy của P.</p>
<p><strong><em>Lưu ý</em></strong>:</p>
<ul>
<li>Việc cực tiểu hoá cross entroypy tương đương với việc cực tiểu hoá KL phân kỳ.</li>
<li>Cross entropy và KL phân kỳ được sử dụng phổ biến trong <em>Machine Learning</em>. Chúng ta thường muốn một phân bố xác suất nào đó tiến gần với một phân bố khác. Ví dụ như chúng ta muốn phân bố của dự đoán tiến gần với phân bố cơ sở. KL phân kỳ cho ta một cái nhìn tự nhiên về vấn đề trên, tuy nhiên có vẻ như cross entropy lại được biết đến và sử dụng rộng rãi hơn.</li>
</ul>
<p><a id="predictive-power"></a></p>
<h2 id="khả-năng-dự-đoán">Khả năng dự đoán</h2>
<!--  -->
<p><img src="/assets/images/ce_post/golden-wheel.jpg" alt="" style="width:350px; height:250px;" /></p>
<p>Ở đây chúng ta sử dụng cross-entropy để đánh giá sự khác biệt giữa 2 phân bố xác suất <script type="math/tex">y</script> và <script type="math/tex">\hat{y}</script> và tính lỗi (<em>loss</em>) dựa trên tổng cross entropy của toàn bộ dữ liệu training.</p>
<p>Cụ thể ta có hàm mục tiêu như sau:</p>
<p>\begin{equation}
H({y^{(n)}}, {\hat{y}^{(n)}}) = \sum_n H(y^{(n)}, \hat{y}^{(n)})
\end{equation}</p>
<p>Một cách tiếp cận phổ biến khác là chúng ta tiến hành điều chỉnh tham số mô hình sao cho <em>likelihood</em> của mô hình với dữ liệu đầu vào đạt <em>max</em>. Với bài toán phân lớp chúng ta thường hay sử dụng mô hình phân biệt (<a href="https://en.wikipedia.org/wiki/Discriminative_model">discriminative model</a>) ở đó dữ liệu training thường bao gồm cả dữ liệu và nhãn cần dự đoán. Nói cách khác chúng ta thường sẽ dự đoán <em>ground-truth labels</em> với dữ liệu cho trước.</p>
<p>Với giả sử dữ liệu của bài toán là độc lập và phân bố đồng nhất (<a href="http://math.stackexchange.com/questions/466927/independent-identically-distributed-iid-random-variables">independent and identically distributed</a>), <em>likelihood</em> sẽ được tính như sau:</p>
<script type="math/tex; mode=display">L(\{y^{(n)}\}, \{\hat{y}^{(n)}\}) = \prod_n L(y^{(n)}, \hat{y}^{(n)})</script>
<p>Vậy thế nào là <strong><em>likelihood</em></strong>? Đó chính là phần tử cụ thể của <script type="math/tex">\hat{y}^{(n)}</script> tương ứng với <em>ground-truth label</em> của <script type="math/tex">y^{(n)}</script>.</p>
<p>Ví dụ trong bài toán phân loại ảnh số MNIST: Với ảnh training thứ nhất có nhãn là <script type="math/tex">y^{(1)} = (0.0, 0.0, 0.0, 1.0, 0.0, 0.0, 0.0, 0.0, 0.0, 0.0)^T</script>, thì <strong><em>likelihood</em></strong> <script type="math/tex">L(y^{(1)}, \hat{y}^{(1)})</script> sẽ là phần tử thứ <em>3-th</em> của kết quả dự đoán <script type="math/tex">\hat{y}^{(1)} = (0.0, 0.1, 0.1, 0.25, 0.0, 0.1, 0.1, 0.35, 0.0, 0.0)^T</script>, hay <script type="math/tex">L(y^{(1)}, \hat{y}^{(1)}) = \hat{y}_{1}^{(1)} = 0.25</script>.</p>
<p>Tiếp tục giả sử chúng ta có tất cả 3 ảnh trong training data là các số 3, 5, 8 với các phân bố <em>ground-truth</em> là:</p>
<p><script type="math/tex">y^{(1)} = (0.0, 0.0, 0.0, 1.0, 0.0, 0.0, 0.0, 0.0, 0.0, 0.0)^T</script>,</p>
<p><script type="math/tex">y^{(2)} = (0.0, 0.0, 0.0, 0.0, 0.0, 1.0, 0.0, 0.0, 0.0, 0.0)^T</script>, và</p>
<p><script type="math/tex">y^{(3)} = (0.0, 0.0, 0.0, 0.0, 0.0, 0.0, 0.0, 0.0, 1.0, 0.0)^T</script>.</p>
<p>Mô hình sẽ dự đoán 3 phân bố tương ứng là:</p>
<p><script type="math/tex">\hat{y}^{(1)} = (0.0, 0.1, 0.1, 0.25, 0.0, 0.1, 0.1, 0.35, 0.0, 0.0)^T</script>,</p>
<p><script type="math/tex">\hat{y}^{(2)} = (0.0, 0.1, 0.1, 0.25, 0.0, 0.3, 0.1, 0.15, 0.0, 0.0)^T</script>, và</p>
<p><script type="math/tex">\hat{y}^{(3)} = (0.0, 0.1, 0.1, 0.25, 0.0, 0.1, 0.1, 0.0, 0.35, 0.0)^T</script>.</p>
<p>Và <em>likelihood</em> của cả training data sẽ là:</p>
<script type="math/tex; mode=display">L(\{y^{(1)}, y^{(2)}, y^{(3)}\}, \{\hat{y}^{(1)}, \hat{y}^{(2)}, \hat{y}^{(3)}\}) = \hat{y}^{(1)}_3 \, \hat{y}^{(2)}_5 \, \hat{y}^{(3)}_8 \</script>
<p>Vậy nhiệm vụ của chúng ta là điều chỉnh tham số mô hình sao cho <em>likelihood</em> <script type="math/tex">L(\{y^{(n)}\}, \{\hat{y}^{(n)}\})</script> đạt <strong><em>max</em></strong>.</p>
<p><a id="unified-loss"></a></p>
<h2 id="likelihood">Likelihood</h2>
<!--  -->
<p><img src="/assets/images/ce_post/tape_measure.jpg" alt="" style="width:350px; height:250px;" /></p>
<p>Cùng phân tích cụ thể hơn về công thức tính <em>likelihood</em> trên:</p>
<p>Thứ nhất, hàm logarit là hàm đơn điệu, do vậy việc <em>cực đại hoá likelihood</em> sẽ tương đương với việc <em>cực đại hoá log likelihood</em>, hay ngược lại là tương đương với việc <em>cực tiểu hoá <strong>negative log likelihood</strong></em>.</p>
<script type="math/tex; mode=display">-\log L(\{y^{(n)}\}, \{\hat{y}^{(n)}\}) = -\log \prod_n L(y^{(n)}, \hat{y}^{(n)}) = -\sum_n \log L(y^{(n)}, \hat{y}^{(n)})</script>
<p>Thứ hai, như chúng ta phân tích ở phần trên, <em>log likelihood</em> của <script type="math/tex">y^{(n)}</script> được tính khá đơn giản chính là log của phần tử tương ứng trong <script type="math/tex">\hat{y}^{(n)}</script>, cụ thể hơn là phần tử thứ <script type="math/tex">i</script> thoả mãn <script type="math/tex">y^{(n)}_i = 1.0</script>.</p>
<p>Do đó chúng ta có thể viết lại công thức tính log likelihood cho mẫu training data thứ <script type="math/tex">n</script> đơn giản hơn như sau:</p>
<script type="math/tex; mode=display">\log L(y^{(n)}, \hat{y}^{(n)}) = \sum_i y^{(n)}_i \log \hat{y}^{(n)}_i</script>
<p>và negative log likelihood cũng được viết lại như sau:</p>
<script type="math/tex; mode=display">- \log L(\{y^{(n)}\}, \{\hat{y}^{(n)}\}) = -\sum_n \sum_i y^{(n)}_i \log \hat{y}^{(n)}_i</script>
<p>Và đây chính là công thức tính tổng tất cả <strong><em>cross-entropy</em></strong> trên toàn bộ training data:</p>
<script type="math/tex; mode=display">-\log L(\{y^{(n)}\}, \{\hat{y}^{(n)}\}) = \sum_n \big[-\sum_i y_i \log \hat{y}^{(n)}_i\big] = \sum_n H(y^{(n)}, \hat{y}^{(n)})</script>
<p><a id="conclusions"></a></p>
<h2 id="thảo-luận">Thảo luận</h2>
<!--  -->
<p><img src="/assets/images/ce_post/politic_discussion_121113_163116.jpg" alt="" style="width:350px; height:250px;" /></p>
<p>Khi xây dựng mô hình xác suất cho bài toán phân lớp có các lớp phân biệt lẫn nhau, chúng ta cần đánh giá sự khác biệt giữa xác suất dự đoán <script type="math/tex">\hat{y}</script> và xác suất <em>ground-truth</em> <script type="math/tex">y</script> và trong quá trình <strong><em>training</em></strong> chúng ta sẽ điều chỉnh tham số sao cho sự khác biệt là nhỏ nhất.</p>
<p>Và các bạn có thể nhận thấy rằng, <strong><em>cross-entropy</em></strong> là một lựa chọn phù hợp cho bài toán phân lớp trên.</p>
<p>Có 2 khía cạnh đánh giá việc tiếp cận này:</p>
<ul>
<li>Thứ nhất, việc cực tiểu hoá cross-entropy cho phép chúng ta tìm được <script type="math/tex">\hat{y}</script> thoả mãn đáp ứng số bits tối thiểu cần thiết để <em>mã hoá</em> thông tin từ <script type="math/tex">y</script> sử dụng <script type="math/tex">\hat{y}</script></li>
<li>Thứ hai, việc cực tiểu hoá cross-entropy tương đương với việc cực tiểu hoá <strong><em>negative log likelihood</em></strong> hay chính là việc đánh giá trực tiếp khả năng dự đoán của mô hình.</li>
</ul>
<p><a id="resources"></a></p>
<h2 id="nguồn-tham-khảo">Nguồn tham khảo</h2>
<ul>
<li><a href="http://colah.github.io/posts/2015-09-Visual-Information/">Visual Information Theory</a></li>
</ul>TonyKhanhThis post reviews some extremely remarkable results in applying deep neural networks to natural language processing (NLP)